--Materials--
(1) One computer with ZDevelop3.01 or above installed.
(2) One controller.
(3) Two 24V DC power supply (Main power & IO power)
(4) Several bus drive + motor (or stepper drive + motor).
(5) A number of controller wiring terminals.
(6) Several network cables.
(7) A number of connecting wires.
(8)
Several expansion modules of different types.
--Wiring Reference--
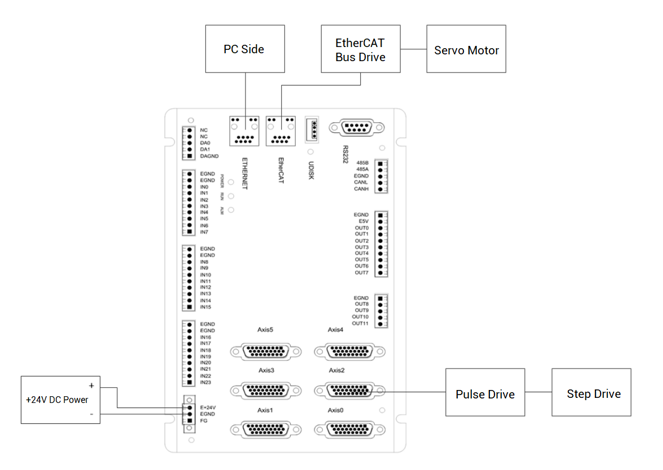
2. Expansion Module Introduction
(1) The function of expansion module
When the axis resources and IO resources of the controller itself are not enough, the expansion module can be used to expand pulse axes, digital inputs and outputs, analog inputs and outputs. But please note only the expansion module with pulse axis interface supports the expansion of the number of pulse axes.
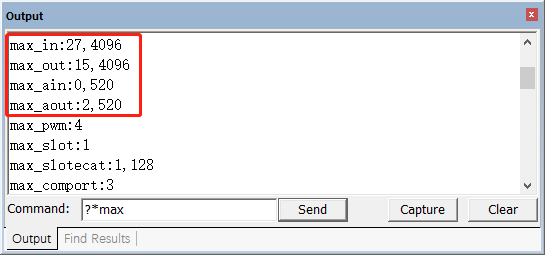
IO digital expansion: 4096 IOs can be expanded for ZMC4XX series motion controllers or above.
(the number of IOs that can be extended of motion controller can be checked through hardware manual or command "?*max")
AIO digital expansion: 520 AIOs can be expanded for ZMC4XX series motion controllers or above.
Axis expansion: pulse axes only can be extended, it is not recommended to use too many axis expansion boards, but the controller model that supports multiple pulse axes can be selected.
The number of IO that can be expanded can be checked through hardware manual or "command and output" window.
(2) The classification of expansion module
--connection method--
There are ZCAN bus expansion modules and EtherCAT expansion module.
--product series--
There are ZCAN expansion modules, EtherCAT expansion module and ZMIO300 expansion modules.
3. EtherCAT Bus Expansion Module
EtherCAT bus expansion module contains two series, EIO expansion modules and ZMIO300-ECAT expansion modules.
And there are many models for EtherCAT expansion modules:
EIO1616MT: it can expand digital IO, there are 16 inputs and 16 outputs.
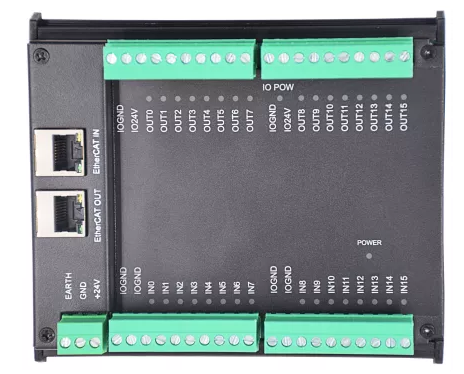
EIO24088: it can expand digital IO and 8 pulse axes, there are 24 inputs and 8 outputs.
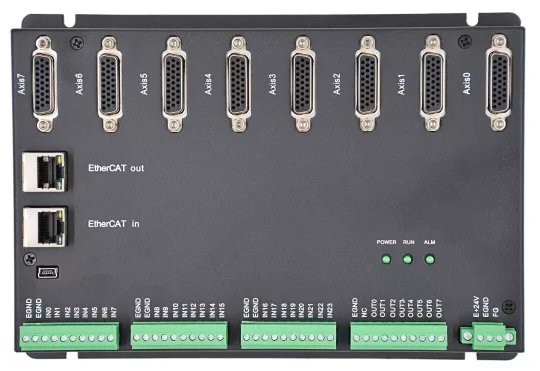
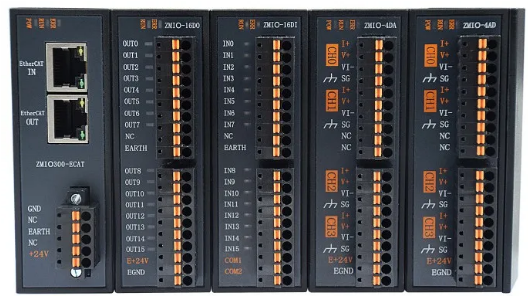
ZMIO300-ECAT: it is vertical combined module, which can expand digital IO and analog.
It is recommended to use STP to transfer network data for EtherCAT communication.
(1) EIO expansion module
EIO expansion modules use EtherCAT bus to expand.
--Models--

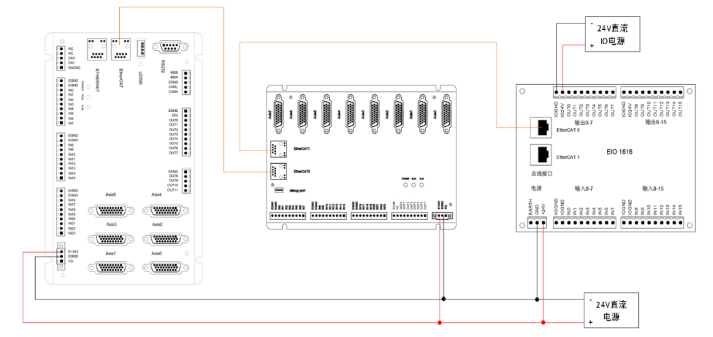
EIO1616 is powered by dual-power supply (in addition to the main power supply, IO also needs to be powered separately), but EIO24088 is powered by a single power supply.
The digital IO interface of the expansion module supports NPN type by default.
EtherCAT expansion module wiring only needs to connect the EtherCAT ports of each module. There are two EtherCAT ports on EIO expansion, EtherCAT IN port is connected to the main controller, and the EtherCAT OUT port is connected to the lower-level expansion board or drive equipment, which cannot be mixed.
--Wiring--
(2) ZMIO300-ECAT expansion module
--Submodules can be matched with ZMIO300-ECAT expansion module--
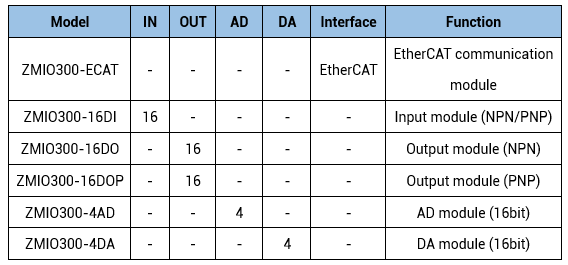
The precision of the analogs is 16 bits, and there are two input modes, NPN and PNP. What's more, the digital inputs and outputs are with the signal status indication light.
And it needs to supply one power separately for ZMIO300-16DO/ZMIO300-DOP output.
--Wiring--
The ZMIO300-ECAT expansion module wiring reference is as follows, which is the same as the EIO expansion module wiring method.
Please note EtherCAT IN port and EtherCAT OUT port can't be mixed.

(3) EtherCAT Basic Usage
The motor connected to the EtherCAT bus needs to write a program to enable it. Then the application after enabling is consistent with the pulse motor, and the motion commands are the same. There shows one initialization program in the end of article.
The initialization process mainly includes the following steps:
1. Bus scan SLOT_SCAN (slot)
2. Axis mapping AXIS_ADDRESS, expansion module IO mapping NODE_IO
3. Bus opening SLOT_START (slot)
4. Drive error clearing DRIVE_CLEAR(0)
5. Axis enable AXIS_ENABLE (single axis enable), WDOG (total enable)
After the initialization is done, then you can use motion control instructions to control the operation of the bus axis.
Attention: extended resources must be mapped to controller local resources, then they can be used.
Different EtherCAT expansion modules are with the same IO mapping and axis mapping methods.
The IO mapping uses the NODE_IO instruction (digital) and the NODE_AIO instruction (analog) to set, and the axis mapping uses the AXIS_ADDRESS instruction.
When IO mapping, first to check the maximum IO number of the controller itself (including the external IO interface and the interface in the pulse axis), and then use the command to set.
If the extended IO number coincides with the IO number of the controller itself, both will take effect at the same time, so the mapped number of the IO map must not be repeated in the entire control system.
(4) Concepts Related To EtherCAT Bus
Involved number concepts are as follows: the bus-related command parameters will use the following numbers:
Slot number (slot):
The slot number refers to the number of the bus interface on the controller, and the slot number of the EtherCAT bus is 0.
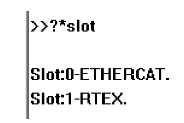
When motion controller supports single-bus, the slot No. is 0.
When motion controller supports dual-bus, EtherCAT bus slot No. is 0, and RTEX bus slot No. is 1.
Device number (node):
The device number refers to the number of all devices connected to a slot. It starts from 0 and is automatically numbered according to the connection sequence of the devices on the bus. You can view the total number of devices connected to the bus through the NODE_COUNT(slot) command.
Drive number:
The controller will automatically identify the drive on the slot, and the number starts from 0, and the number is automatically numbered according to the connection sequence of the drive on the bus.
The drive number is different from the device number. Only the drive device number on the slot is assigned, and other devices are ignored.
(5) EtherCAT Bus IO Mapping
--Digital--
The IO number of the EtherCAT bus expansion module is set through the bus command NODE_IO, and the input and output are configured at the same time. And it only can be set after bus scanned.
Grammar:
NODE_ IO( slot, node ) = iobase
slot: slot number, 0-default
node: device number, starting from 0
iobase : mapping the IO start number, the setting result will only be a multiple of 8
Example:
SLOT_SCAN(0)
'scan the bus
IF NODE_COUNT(0)>0 THEN 'judge whether there is device one slot 0
NODE_IO(0,0)=32
'set the IO starting number of slot 0 interface device 0 to 32
?NODE_IO(0,0)
'print IO starting No. of device 0
ENDIF
--Analog--
The AIO number of the EtherCAT bus expansion module is set through the bus command NODE_AIO, and the input and output are configured at the same time. And it only can be set after bus scanned.
Grammar:
NODE_ AIO( slot, node[,idir]) = Aiobase
slot: slot number, 0-default
node: device number, starting from 0
idir: AD/DA selection. 0-default, AIN and AOUT are set at the same time, when reading, only AIN is read, 3-AIN, 4-AOUT.
Example:
SLOT_SCAN(0)
'scan the bus
IF NODE_COUNT(0)>0 THEN 'judge whether there is device one slot 0
NODE_AIO(0,0,0)=8
'set the AIO and AOUT starting number of slot 0 interface device 0 to 8
?NODE_IO(0,0,0)
'print AIO starting No. of device 0
ENDIF
(6) EtherCAT Bus Axis Mapping
Before using the axis of the expansion module, you need to use the AXIS_ADDRESS command to map the axis number, and the axis mapping also needs to pay attention to the axis number of the entire system cannot be repeated. The mapping syntax of the EIO series extended axis is the same as that of the bus driver.
Grammar:
AXIS_ADDRESS( axis number )=(slot number<<16)+driver number+1
Example:
AXIS_ADDRESS(0)=(0<<16)+0+1 'the first drive on the EtherCAT bus, drive number 0, bound as axis 0
AXIS_ADDRESS(2)=(2<<16)+1+1 'the second drive on the EtherCAT bus, drive number 1, bound as axis 2
AXIS_ADDRESS(1)=(1<<16)+2+1 'the thrid drive on the EtherCAT bus, drive number 2, bound as axis 1
ATYPE(0)=65
'set as ECAT axis type, 65-position, 66-speed, 67-torque
ATYPE(1)=65
ATYPE(2)=65
(7) EtherCAT Bus State
When connected to controller and scanned the bus, enter "?*EtherCAT" in the online command to print out the status of each NODE node.

Slot 0 contains 1 nodes: Slot 0 contains a total of 1 devices
Lostcount 0-0: the number of lost packets
Node: device connection NODE number
Status: device connection status, refer to NODE_STATUS
Mainid: Manufacturer ID
Productid: device ID
Axises: the total number of axes of the device
Alstate: device OP state
Node_profile: device profile setting
Bindaxis: the axis number mapped to the controller, -1 means not mapped
Drive_profile: device send and receive PDO configuration
Controlword: control word
Drive_status: the current status of the device, refer to DRIVE_STATUS
Drive_mode: device control mode
Target: motor position
Encode: encoder position
4.
EtherCAT Expansion Module Wiring Configuration
After the wiring of the control module is completed, use the ZDevelop software to connect to the controller, run the bus initialization program firstly, at the same time, open the
"Controller" - "State the controller"window to check the slot 0 node information, also, there are information of all devices connected to the EtherCAT bus.
--EIO expansion module--
Control module configuration:
1 ZMC432+1 EIO1616MT.
The node No. of EIO1616MT is 0, and the extended digital input IO No. are 1024-1039, a total of 16, the extended digital output IO No. are 1024-1039, a total of 16.
NODE_IO(0,0)=1024

--ZMIO300-ECAT expansion module--
Control module configuration:
1 ZMC432+1 ZMIO300-ECAT communication module+4 ZMIO300-16DI (input)+2 ZMIO300-16DO (output)+1 ZMIO300-4AD+1 ZMIO300-4DA.
NODE_IO(0,0)=32
'IO mapping, the starting number starts from 32, 64 inputs and 32 outputs are expanded
NODE_AIO(0,0,0)=4
'AIO mapping, starting number starts from 4, 4 inputs and 4 outputs are expanded

(1) Configuration 1
Control module configuration:
1 ZMC432+2 bus drivers.
Use ZDevelop software to connect to the controller, after executing the bus initialization program, open the "Controller" - "State the Controller" window to view the information of the node in slot 0, or enter "?*EtherCAT" in the online command bar to print out each NODE node status.

At this time, two nodes can be scanned on the bus. And these two nodes are bus drivers. Each driver has a motor. Then, the axis of node 0 is mapped to axis 6, and the axis of node 1 is mapped to axis 7.
AXIS_ADDRESS(6)= (0<<16)+0+1 'map axis number
AXIS_ADDRESS(7)=(0<<16)+1+1
ATYPE(6)=65
'set control mode, 65-position 66-speed 67-torque
ATYPE(7)=65
Enter ?*EtherCAT in the online command bar to print the information as follows:

(2) Configuration 2
1 ZMC432+1 EIO1616MT+2 bus drivers.
Use ZDevelop software to connect to the controller, after executing the bus initialization program, open the "Controller" - "State the Controller" window to view the information of the node in slot 0, or enter "?*EtherCAT" in the online command bar to print out each NODE node status.

At this time, 3 nodes can be scanned on the bus, node 0 is EIO1616MT digital IO expansion module, and it is with 16 inputs and 16 outputs, the IO mapping number range is 32-47, NODE_IO(0,0)=32
Both nodes 1 and 2 are bus drivers, and each driver has a motor. The axis numbers of these two axes are mapped to axis 6 and axis 7 respectively.
Enter ?*EtherCAT in the online command bar to print the information as follows:

That's all, thank you for your reading -- Motion Control Quick Start (8) | How to Use EtherCAT Expansion Module.
For more information, please pay close attention to "Support" and "Download" , and there are other platforms about Zmotion - Youtube & LinkedIn & Twitter & Tiktok & Facebook, including technical information (development environment, routine code), product showing, company development, etc.


