
Motion Control Quick Start Knowledge keeps moving.
Before, we had learned:
quick start (1) -- firmware update
quick start (2) -- ZBasic program development
quick start (3) -- ZPLC program development
quick start (4) -- Communicate with HMI
quick start (5) -- IO Input & Output
quick start (6) -- Data Storage
quick start (7) -- ZCAN Expansion Module
quick start (8) -- EtherCAT Expansion Module
quick start (9) -- Oscilloscope
quick start (10)--Multiple Task Operation
quick start (11)--Interrupt Application on Zmotion motion controller
quick start (12)--How To Use U Disk Interface For Zmotion Motion Controller
quick start (13)--How To Use ZDevelop Programming Software
Hi, everyone, nice to meet you.
In last "Motion Control Quick Start" article, we talked about ZDevelop programming software in details. The author thinks you may remember the axis parameter window in ZDevelop. Therefore, today, let’s learn some main axis parameters. In addition, there are two parts for axis parameters to ensure the best learning effect.
Now, Let's begin!
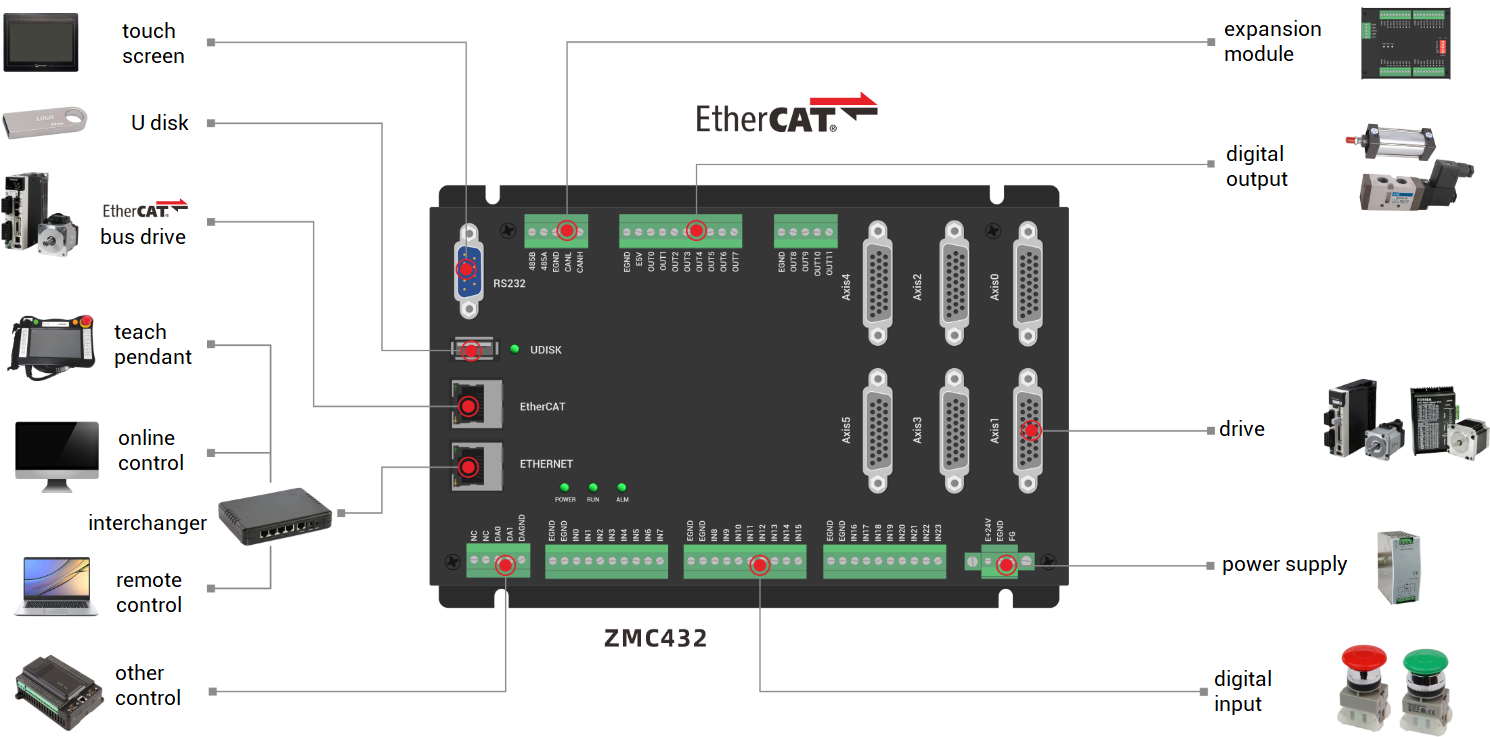
1. Material Preparation
One computer that is installed ZDevelop V3.10 or above versions
One controller
One 24V DC power supply
A series of bus driver + motor / stepper driver + motor
A series of controller wiring terminals
A series of network cables
A series of connecting cables
(According to actual requirements, select input and output devices, expansion module, hmi, etc.
2. Axis Parameters Introduction
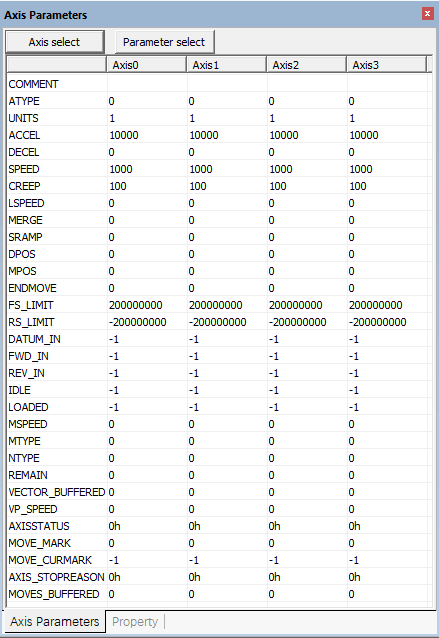
BASE: select axis
ATYPE: axis type
UNITS: pulse amount
SPEED: axis speed
ACCEL: axis acceleration
DECEL: axis deceleration
SRAMP: acceleration and deceleration curve
FASTDEC: emergency stop deceleration
CREEP: creep speed
LSPEED: starting speed
AXIS: select temporary axis
DPOS: axis instruction position
MPOS: encoder feedback position (measurement position)
MERGE: set motion continuous interpolation
(1) BASE -- Axis Selection
Grammar: BASE (axis 0, axis 1, axis 2...)
The number of maximum axes is determined by controller actual hardware.
The BASE command is used to read/write the parameters of the axis leading to the next motion command to a specific axis or group of axes.
And each process has own BASE axis-group, each program can be assigned independently. ZBasic program and the motion generator that controls motion axes are separate.
In addition, each axis' motion generator has independent function, which means each axis can program by each speed, acceleration. And axes can be linked together through superposition motion, synchronous motion or interpolation, please note the speed of interpolation uses main axis parameter, generally, the first axis selected by BASE is the master axis.
For example:
BASE(0,1,2,3) 'select axis 0, axis 1, axis 2 and axis 3, axis 0 is the main axis
BASE(3,2,5) 'select axis 3, axis 2 and axis 5, axis 3 is the main axis

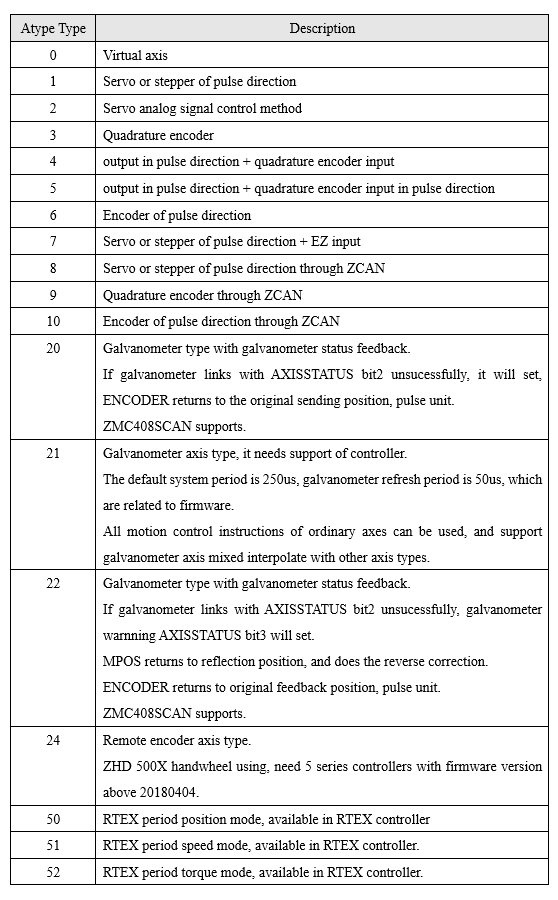
(2) ATYPE -- Axis Type
Grammar: ATYPE=type value
It is used to set axis type, axis type list is provided, it only can set the axis type that is supported by current axis.
And hybrid interpolation of different types is valid.
Attention: it should be set before program initialization, it can't run normally if ATYPE is not matched.
Please refer to below form.
For example:
BASE(0,1,2) 'axis 0 is the main axis
ATYPE = 1,1,1 'set as pulse axis type (axis 0, axis 1 and axis 2 are pulse type)
ATYPE AXIS (4) = 3 'set axis 4 as quadrature encoder type
ATYPE (3) = 65 'set axis 3 as ECAT period position mode 65
(3) UNITS - Pulse Amount
Grammar: UNITS=pulse amounts / UNITS (axis No.) = pulse amounts
Controller takes UNITS as basic unit, it specifies how many pulses to sent in one unit, and it supports 5 decimal places of precision.
Actually, UNITS is the link between the user unit and the pulse unit, when UNITS=10000, MOVE(2) will send 20000 pulses to the motor.
If the motor has no mechanical load, the number of revolutions of the motor depends on the number of pulses required for one revolution of the motor.
Example 1: the motor needs 10,000 pulses to make one revolution, and MOVE(3) wants the motor to make three revolutions, then UNITS=10000.
Example 2: The motor needs 2^17 pulses to make one revolution, and MOVE(2) wants the motor to make two revolutions, then UNITS=2^17.
Example 3: The motor needs 10,000 pulses to make one revolution, and the motor is connected to a 10mm screw, then 1,000 pulses means that the screw moves forward by 1mm, then UNITS=1000, and MOVE(5) means that the screw moves forward by 5mm.
Setting reference:
Assume that the motor U=3600 pulses make one revolution, and the UNITS corresponding to the motor turning 1°: UNITS=U/360=3600/360=10, at this time MOVE(1), the motor turns 1°.
Assume that the motor U=3600 pulses make one revolution, the lead screw travels one pitch per revolution, the pitch P=2mm, and the corresponding UNTIS of the workbench travels 1mm: UNITS=U/P=3600/2=1800, at this time MOVE(1), the workbench walks 1mm.
When the machine has a reduction ratio, the reduction ratio should be counted, assuming that the reduction ratio i=2:1, UNITS=U*i/P=3600*2/2=3600.
(4) SPEED - Axis Speed
This is the speed when axis is running, the unit is UNITS/S.
(5) ACCEL - Acceleration
This is the speed that is reached in each second, the speed is larger, target speed SPEED time is shorter.
The unit is UNITS/S^2.
(6) DECEL - Deceleration
The principle of axis deceleration is the same as ACCEL, when decel is not set, deceleration equals to deceleration value.
Speed, acceleration and deceleration will take effect immediately after modification, it is recommended to set when in initialization.
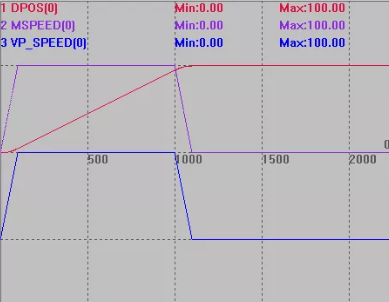
For example:
RAPIDSTOP(2)
WAIT IDLE(0)
UNITS (0) =1000
SPEED (0) = 100
ACCEL (0) = 400
DECEL (0) = 400
SRAMP (0) = 0
DPOS (0) = 0
TRIGGER
MOVE (100) AXIS (0)
(7) SRAMP - Acceleration & Deceleration Curve
Set S curve in acceleration and deceleration process, which is used to smooth acceleration and deceleration.
Grammar: SRAMP = smooth time
Smooth time range: 0-250ms, after set, acceleration and deceleration process will delay corresponding time.
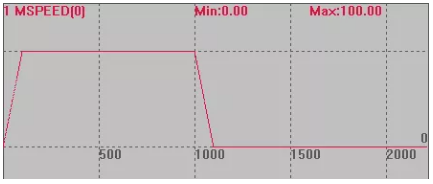
--T-shaped Curve--
When SRAMP=0, the speed curve is a T-shaped curve, and the speed curve changes according to the trapezoidal curve. Keep the parameter values such as speed, acceleration and deceleration unchanged.
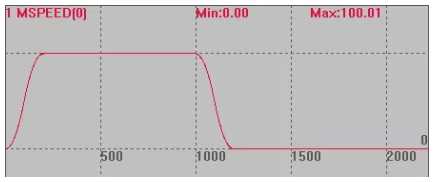
--S-shaped Curve--
Set the appropriate acceleration and deceleration rate by setting the value of SRAMP, so that the speed curve is smooth and the vibration is reduced when the machine starts and stops or accelerates and decelerates. The range of the SRAMP value is between 0-250 milliseconds. After setting, the acceleration and deceleration process will become longer correspondingly. The longer the time, the smoother the speed curve. If the setting time exceeds 250 milliseconds, it will be smoothed according to 250 milliseconds.
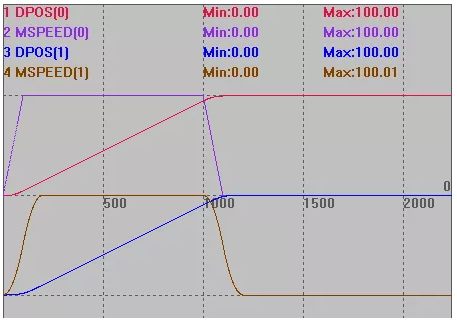
For example:
RAPIDSTOP(2)
WAIT IDLE(0)
WAIT IDLE(1)
BASE(0,1)
ATYPE=1,1
UNITS=100,100
SPEED=100,100
ACCEL=1000,1000
DECEL=1000,1000
DPOS=0,0
MPOS=0,0
SRAMP(0)=0 'axis 0 T-shaped curve
SRAMP(1)=200 'axis 1 S-shaped curve
TRIGGER
MOVE(100) AXIS(0) 'axis 0 motion
MOVE(100) AXIS(1) 'axis 1 motion
(8) FASTDEC - Emergency Stop Deceleration
Emergency stop deceleration, the unit is UNITS/S^2.
It is automatically adopted when in CANCEL and RAPIDSTOP and reaching the limit or in abnormal stop. When set to 0 value or less than DECEL value, it will be DECEL automatically.
For example:
RAPIDSTOP(2)
WAIT IDLE(0)
BASE(0) 'select axis 0
DPOS=0
UNITS=100
SPEED=100
ACCEL=500
DECEL=500 'deceleration
FASTDEC=2000 'fast deceleration
TRIGGER 'trigger the oscilloscope automatically
VMOVE(1) 'continue to move forward
DELAY(1000) 'wait for 1s
CANCEL(2) 'stop rapidly
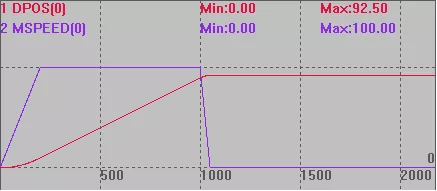
FASTDEC=2000
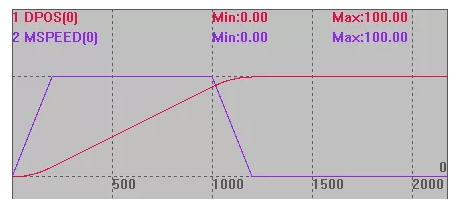
FASTDEC=0 emergency stop uses DECEL deceleration
(9) CREEP - Creep Speed
The crawling speed of the axis when returning to zero is used to search the origin, the unit is units/s. For the method of use, please refer to the description of the DATUM single-axis origin finding command below.
(10) LSPEED - Initial Speed
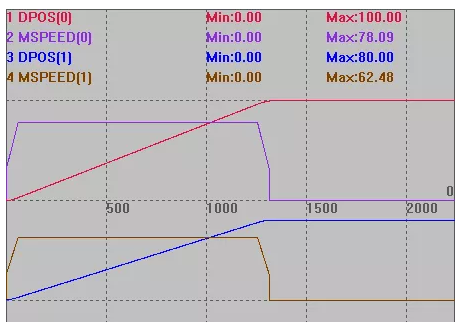
The starting speed of the axis is also used for the stopping the speed, the default is 0, and the unit is units/s.
When in multi-axis motion, it is used as the initial speed of interpolation motion.
When the efficiency is needed, you can consider setting the starting speed.
For example:
BASE(0,1) 'select axis 0 as the main axis
DPOS=0,0
UNITS=100,100 'pulse amount 100
SPEED=100,100 'main axis' speed
ACCEL=1000,1000
DECEL=1000,1000
LSPEED(0)=40 'initial speed
TRIGGER 'automatically trigger the oscilloscope
MOVE(100,80) 'movement distance of each axis
(11) AXIS - Select Temporary Axis
Grammar: AXIS (axis No.)
AXIS temporarily modifies a motion command or axis parameter to execute on a specified axis. AXIS parameters can be added after many commands, which is especially effective on the command line or program line.
For example:
PRINT MPOS AXIS(3) 'print MPOS of axis 3, equivalent to PRINT MPOS(3)
PRINT MPOS(4) 'print MPOS of axis 4
MOVE(300) AXIS(2) 'axis 2 moves 100
REP_DIST AXIS(1)= 100 'set the coordinate cycle position of axis 1
(12) DPOS - Axis Instruction Position
The virtual coordinate position of the axis, or the demand position, the unit is UNITS.
This parameter is often used to monitor the operation of motion commands. Writing DPOS will automatically convert to OFFPOS offset, which only modifies the coordinates and does not move the motor.
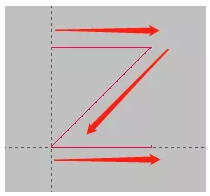
BASE(0,1)
DPOS=0,100
MOVE(100,0) 'the first segment
MOVE(-100,-100) 'the second segment
MOVE(100,0) 'the third segment, end point (100,0)
(13) MPOS - Encoder Feedback Position
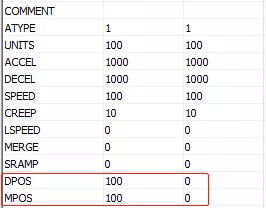
The measurement feedback position of the axis, the unit is UNITS.
This parameter is often used to monitor the feedback position of the encoder. And writing MPOS will automatically convert to OFFPOS offset and only the coordinates is modified.
When the encoder is not connected, MPOS=DPOS.
(14) MERGE - Open Continuous Interpolation
Grammar: MERGE = ON/OFF or 1/0
Turn on the continuous interpolation function to connect the buffered motions before and after the motion buffer, so that there is no deceleration between continuous multi-segment interpolation motions, so as to improve processing efficiency.
If continuous interpolation is not enabled, after the previous interpolation movement is completed, it will decelerate and stop until the speed is 0, and then re-accelerate to execute the next interpolation movement.
For example:
BASE(0) 'select axis 0
DPOS=0
UNITS=100
SPEED=100
ACCEL=500
DECEL=500
MERGE=ON 'open continuous interpolation
TRIGGER 'automatically trigger the oscilloscope
MOVE(100) 'the first movement
MOVE(100) 'the second movement
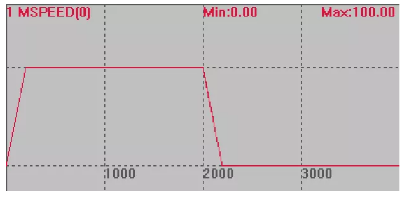
MERGE=ON
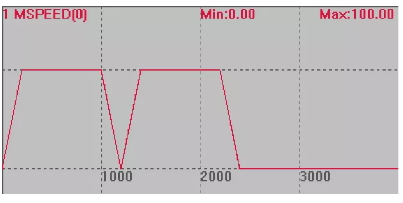
MERGE=OFF
When MERGE is ON, multi-interpolation motions still decelerate in between, some possible reasons as follow:
1. MERGE is not set successfully, check from the "output" window or axis parameter window.
2. Controller is point-to-point model, which means it doesn’t support continuous motion.
3. CORNER_MODE was set to define corner deceleration, and print result to check.
4. SP motion instructions are in process, and ENDMOVE_SPEED and STARTMOVE_SPEED are set, then speed will follow value of these two instructions.
5. Main axis was switched between interpolation motions, and main axis parameters were also changed.
6. MOVE_DELAY was added between interpolation motions, even MOVE_DELAY was set as 0, it also will cause deceleration.
3. Input Configuration of Common Axis Parameters
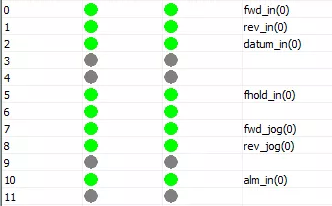
(1) INVERT_IN - Inverse Input
Invert input status, it can read and judge whether there is and inversion.
Grammar: INVERT_IN(input channel, ON/OFF) ON-invert, OFF-not to invert
When the ZMC controller input is OFF, it is considered that there is a signal input, and use INVERT_IN to reverse electric level to obtain opposite effect.
When the ECI controller input is OFF, it is considered that there is a signal input, and use INVERT_IN to reverse electric level to obtain opposite effect.
For example:
BASE(0,1,2,3) 'select axis 0,1,2,3
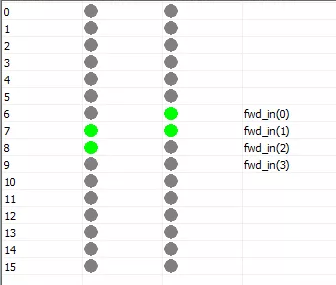
FWD_IN=6,7,8,9 'respectively set the positive limit switch
INVERT_IN(6,ON) 'inverse signal
INVERT_IN(7,ON)
Set the signal inversion at IN6 and IN7, and give the input signal to IN6 and IN8, the status of the input port is as shown in the figure.
(2) Map Positive/Negative Position Limit Input
FWD_IN: map positive limit input
REV_IN: map negative limit input
Set the input No. corresponding to the positive/negative hardware limit switch respectively, -1 means invalid.
The hardware limit switch is a physical switch element, which is mapped to the corresponding input switch signal by the command. After the limit signal of the controller takes effect, the axis will be stopped immediately, at this time, the stop deceleration is FASTDEC.
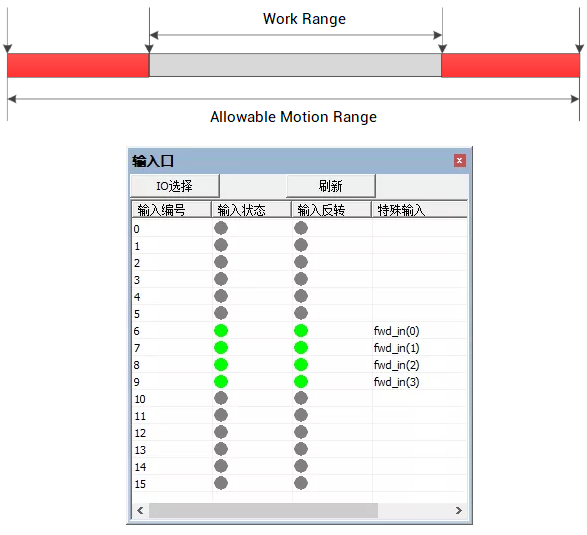
For example:
BASE(0,1,2,3) 'select axis 0, axis1, axis 2 and axis 3
FWD_IN=6,7,8,9 'set forward position limit switch respectively
INVERT_IN(6,ON) 'inverse the signal
INVERT_IN(7,ON)
INVERT_IN(8,ON)
INVERT_IN(9,ON)
Soft position limit is used to limit axis DPOS position range and used for software safety position limit.
FS_LIMIT——forward soft position limit configuration
FS_LIMIT(0)=200 'set axis 0 forward soft position limit as 200units
RS_LIMIT——negative soft position limit configuration
RS_LIMIT(0)=-300 'set axis 0 reverse soft position limit as -300units
(3) DATUM_IN - Map Origin Input
The general input port is set as the origin switch signal, and -1 is invalid.
This signal input takes effect only during the axis homing.
(4) ALM_IN - Map Alarm Input
The input No. corresponding to the driver alarm, -1 is invalid.
After the controller alarm signal takes effect, it will stop the axis immediately, and the stop deceleration is FASTDEC.
For example:
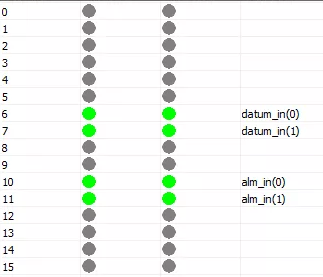
BASE(0,1)
DATUM_IN =6,7 'define the origin input of axis 0 and axis 1 to IN6 and IN7 respectively
INVERT_IN(6,ON) 'invert the origin signal
INVERT_IN(7,ON)
ALM_IN = 10,11 'define the alarm signals of axis 0 and 1 to IN10 and IN11 respectively
INVERT_IN(10,ON) 'invert the signal
INVERT_IN(11,ON)
(5) FHOLD_IN - Map Holding Input
Corresponding input No. of hold input, and -1 is invalid.
If there is an input signal, the speed of the motion axis changes from the program speed to the FHSPEED parameter speed, and when the input is canceled, the motion speed during the motion returns to the program speed.
(6) FHSPEED - Holding Speed
Axis hold speed is the speed that is held when FHOLD_IN is pressed, the unit is units/s.
Only when the corresponding input is in the hold state can it keep moving at this speed.
For example:
RAPID STOP(2)
WAIT IDLE(0)
BASE(0) 'select axis 0
DPOS=0 'the coo