
Motion Control Quick Start (1) – How to Update Motion Controller
Motion Control Quick Start (2) – How to Develop Motion Controller by Basic
Motion Control Quick Start (3) – How to Develop Motion Controller by PLC
Video Description for Motion Control Quick Start 4:
@Zmotioncontroller123
Before building the connection between motion controller and HMI, we need to know what kind of HMI that can be connected with motion controller. The condition is that HMI must support MODBUS communication protocol. And when they are communicating through MODBUS protocol, it needs to save data into MODBUS register.
Then, let's see what is controller MODBUS register and their corresponding relationship.
(1) What is MODBUS Register
There are two types of MODBUS registers, bit register and word register, and they both use MODBUS standard communication protocol.
--bit register--
MODBUS_BIT
For HMI, it is MODBUS_0X, Boolean type.
--word register--
MODBUS_REG (16-bit integer)
MODBUS_LONG (32-bit integer)
MODBUS_IEEE (32-bit floating)
MODBUS_STRING (8-bit byte)
For HMI, they areMODBUS_4X.
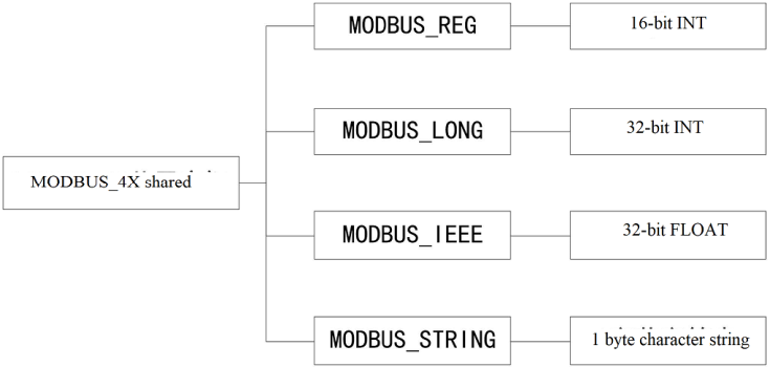
In controller, MODBUS word registers all share one same system variable space. And one LONG and one IEEE both occupy two REG addresses separately. Therefore, please note the register No. when using.
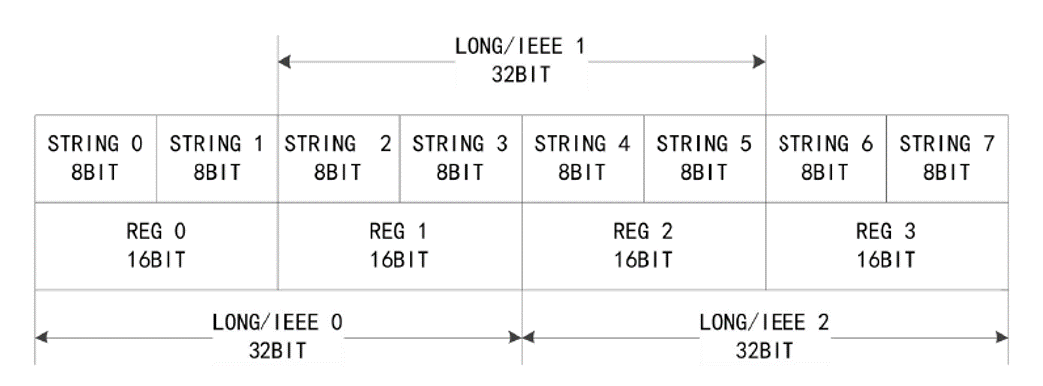
MODBUS_LONG (0) = MODBUS_REG (0) + MODBUS_REG (1)
MODBUS_LONG (1) = MODBUS_REG (1) + MODBUS_REG (2)
MODBUS_IEEE (0) = MODBUS_REG (0) + MODBUS_REG (1)
MODBUS_IEEE (1) = MODBUS_REG (1) + MODBUS_REG (2)
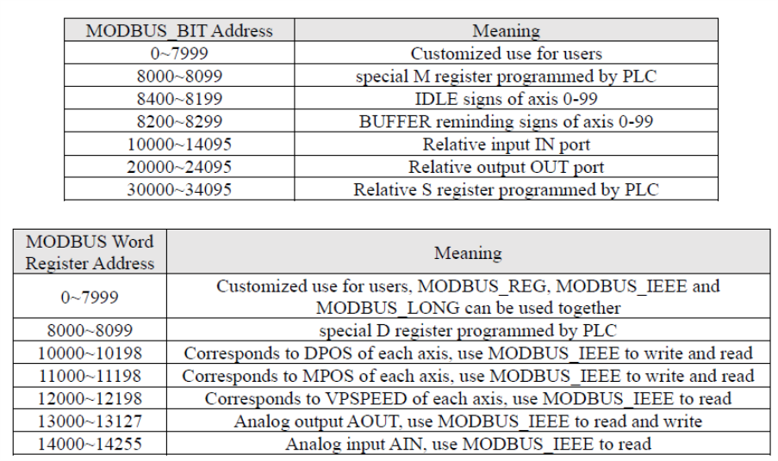
Through MODBUS, data is saved into MODBUS register. Below shows storage space.
(2) Controller & HMI MODBUS Address Relation
It is with different address mapping relationship.
--Zmotion Controller & WEINVIEW HMI--
When Zmotion motion controller is communicating with Weinview HMI, controller MODBUS and Weinview HMI both start from 0, so they are corresponding.
For example:
Controller MODBUS_BIT (0) & HMI MODBUS_0X_0, Boolean type.
Controller MODBUS_REG (0) & HMI MODBUS_4X_0, word register.
--Zmotion Controller & MCGS HMI--
When Zmotion motion controller is communicating with MCGS HMI, controller MODBUS starts from 0, MCGS HMI starts from 1, so HMI address + 1.
For example:
Controller MODBUS_BIT (0) & HMI MODBUS_0X_1, Boolean type.
Controller MODBUS_REG (0) & HMI MODBUS_4X_1, word register.
In addition, controller program can be edited by Basic or PLC in ZDevelop. ZDevelop is one free programming software researched by Zmotion. It is easy to edit, debug and compile.
2. How to Connect Controller and HMI
There are two ways to build the connection.
(1) Net-Port
There are two net-port channels at least for motion controller, the port No. of ethernet is 502, and this supports HMI connection through MODBUS_TCP protocol.
Controller default IP address is "192.168.0.11", IP address can be checked in ZDevelop -- State the Controller. If you want to change the address, use IP_ADDRESS or modify in window. And this modification takes effect all the time.

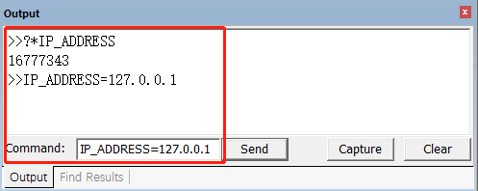
--how to check net-port channel--
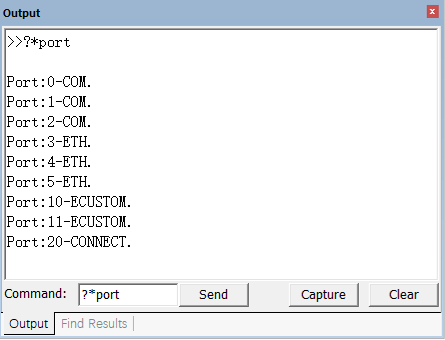
Different controllers support different serial port channels and net port channels. It can be checked through entering "?*port" in "output" window. And when the number of channels is confirmed, which means how many equipment can be connected for controller at the same time.
If you want to know whether the port is used or not, through "*port_status".
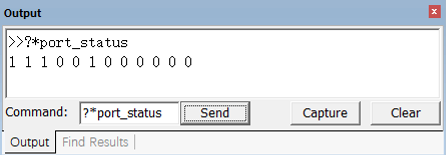
--how to check net-port channel protocol--
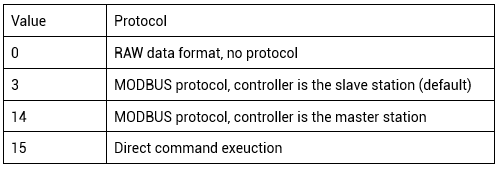
Use PROTOCOL command to return the communication protocol of current channel, then judge through return value.
VAR1=PROTOCOL(port)
port: channel No.
return value:

(2) Serial-Port
Usually, RS232 serial port or RS485 serial port can be used, and the default parameters are "Baud rate 38400, data bit 8, stop bit 1 and no parity". And theses parameters can be configured through "SETCOM". Please note SETCOM parameters will recover default values after power on again. Therefore, SETCOM should be edited at the beginning of the program. And all serial ports' MODBUS protocol station No. ADDRESS is 1-127, the default value is 1.
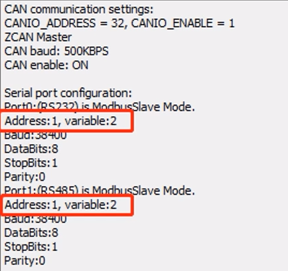
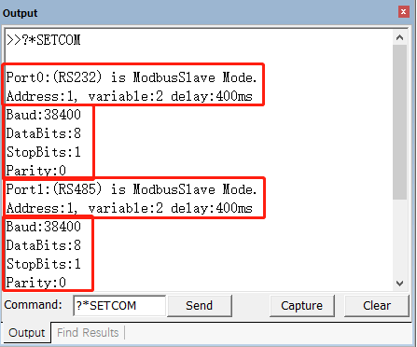
--how to select MODBUS master station and slave station--
For SETCOM command, actually it has several functions.
Firstly, it can configure serial port's communication basic parameters.
Secondly, it can configure communication protocol, that is, it sets whether controller is master device or slave station.
Thirdly, it can open custom communication mode, that is, when mode = 0, it is non-protocol mode.
Grammar: SETCOM (baudrate, databits, stopbits, parity, port[,mode] [,variable] [,timeout])
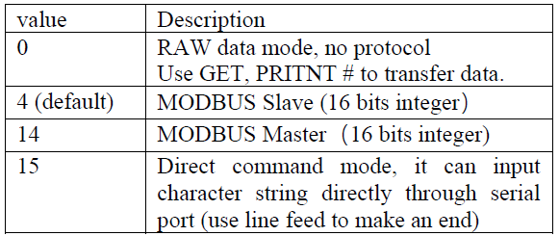
mode: select protocol.
For example, when connecting with HMI, select 4 for mode parameter.
Port0: setcom (9600, 8, 1, 0, 0, 4, 2, 1000)
Port1: setcom (9600, 8, 1, 0, 1, 4, 2, 1000)
--how to keep configuration when power-off--
SETCOM command also can select the register through "variable" parameter, MODBUS register is chosen by default, sepcifically, it can configure whether uses power-down to save register data.
variable: select register, controller default is 2, at this time, system MODBUS register and VR are two independent areas.
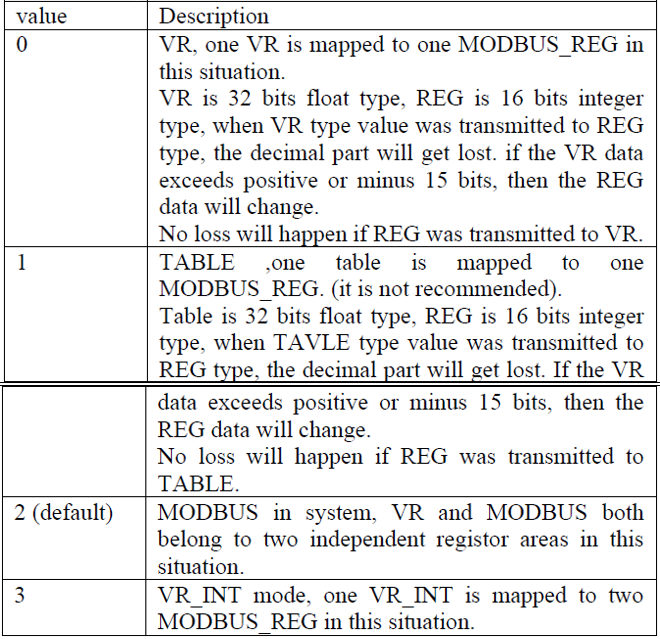
For example
Port0: setcom(9600,8,1,0,0,4,2,1000)
(3) Connection Steps
a.for controller, use ZDevelop to edit the program, then download it into controller.
b.for HMI, use corresponding programming software to edit, then download it into HMI.
c. when programs are downloaded, select serial port or ethernet port to connect HMI and controller.
4. One Real Example: Zmotion Controller & WEINVIEW HMI
(1) Controller Program
a. edit controller program in ZDevelop.
b. download it into motion controller.
(2) HMI Program
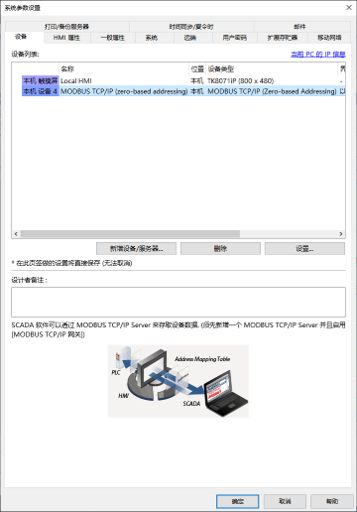
a. edit HMI program in EasyBuilder software, then open "system parameter configuration" window.
b. add the device
In the device list, there shows local HMI and local device. If there is local device, double-click this row, if no, click "new build device / servicer", then device property window will pop up.
c. select device property and set system parameters
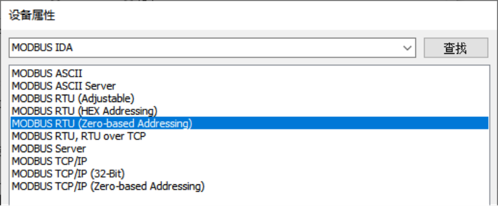
First to select MODBUS IDA communication protocol, later select again according to HMI and controller real connection method.
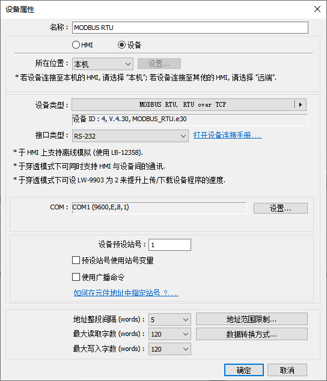
--through serial port--
device type: MODBUS_RTU (Zero-based Addressing)
interface type: serial port type, RS485/RS232
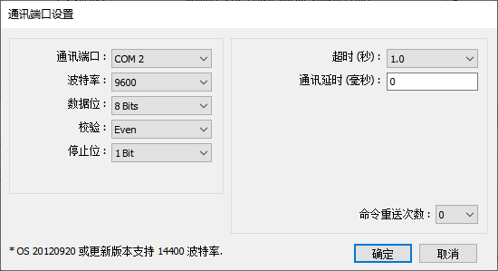
COM: communication port parameters, baud rate, etc.
At this time, parameters must be same as controller port parameters, when set well, close the "system parameter configuration" window.
--through net port--
device type: MODBUS_TCP/IP (Zero-based Addressing)
interface type: ethernet is used automatically
IP: controller IP address to be connected
When set well, close the "system parameter configuration" window.
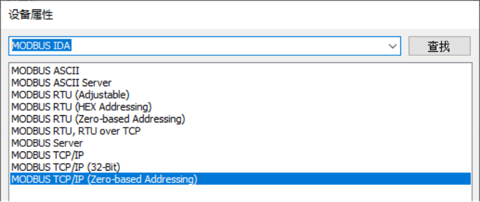
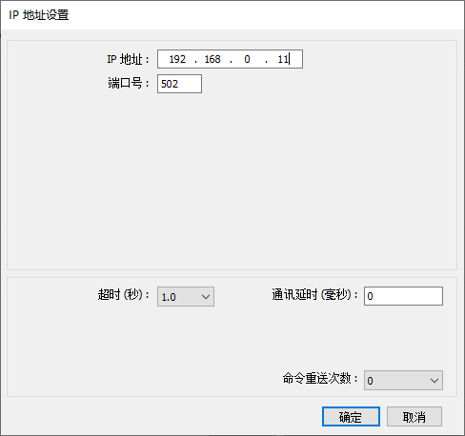
d. edit HMI program well,connect HMI to PC. Then when program is downloaded into HMI successfully, disconnect.
e. connect HMI and controller.
f. now, HMI can communicate with controller.
Note: if there is no controller or HMI, simulator can be used. Download ZDevelop program into simulator, then in EasyBuilder software, select device type as MODBUS IDA-MODBUS TCP/IP (Zero-based Addressing), IP address for simulator is 127.0.0.1, and select "online simulation".
(3) Real Programs
A. WEINVIEW Program
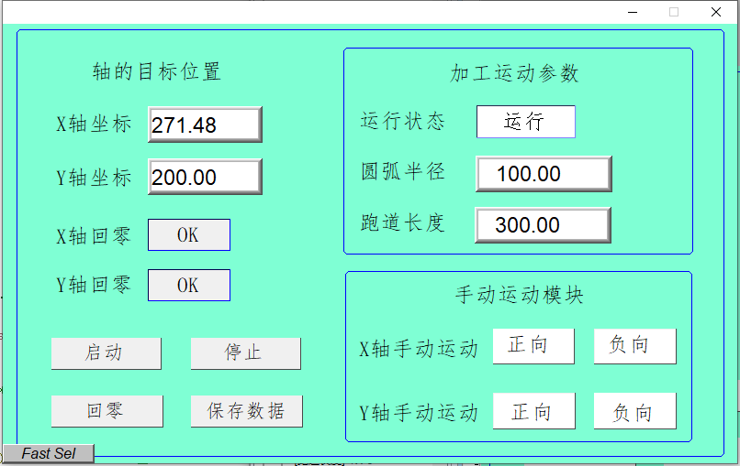
B. Controller Program (Basic Code)
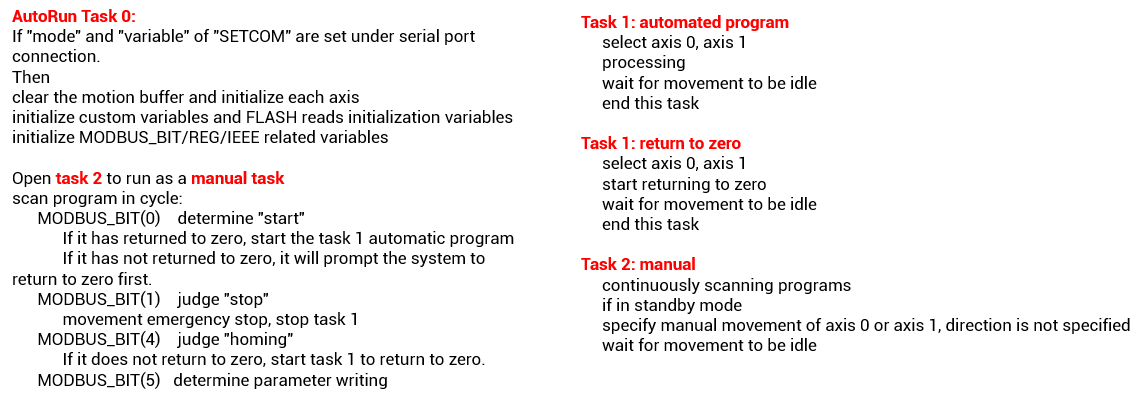
a. five main modules
--initialization: axis parameters, variable definition, button reset
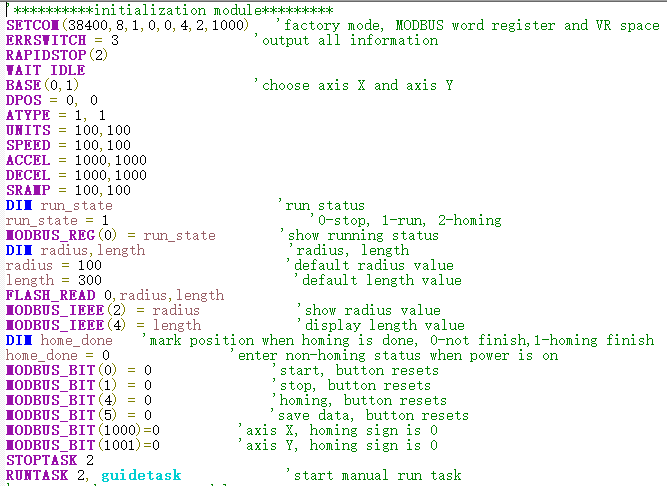
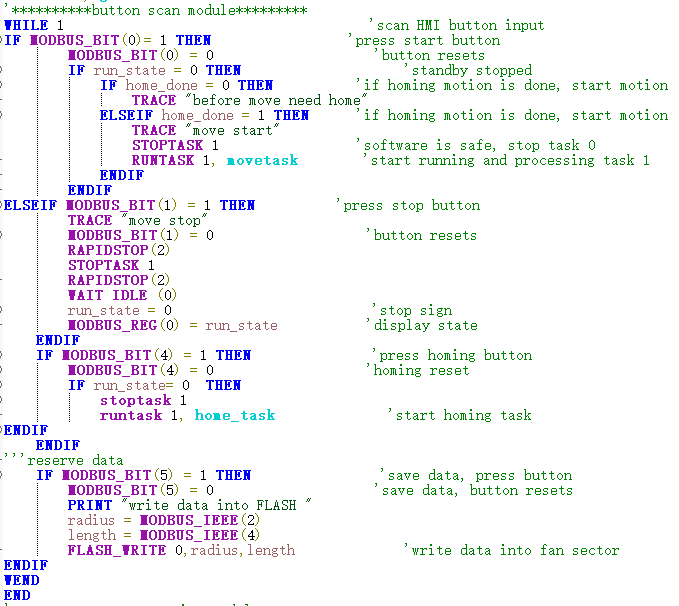
--button scan: on, off, homing, data storage, corresponding program execution
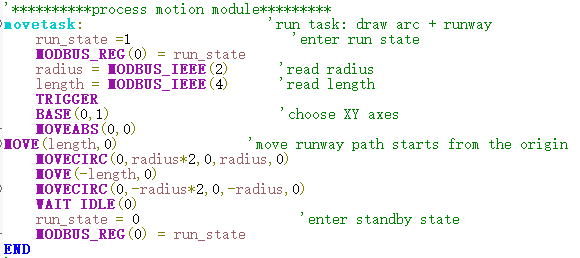
--processing motion: press "on" to call and execute motion command
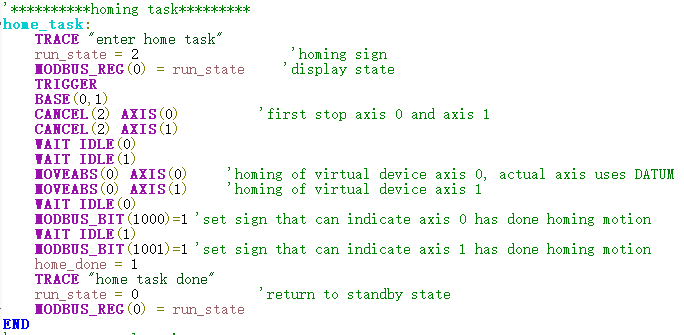
--homing: press "homing" to call and execute axis homing
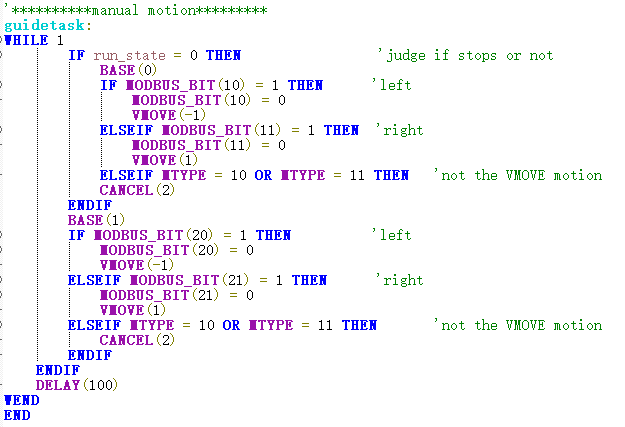
--manual motion: trigger axis forward or inverse manually
b. tasks
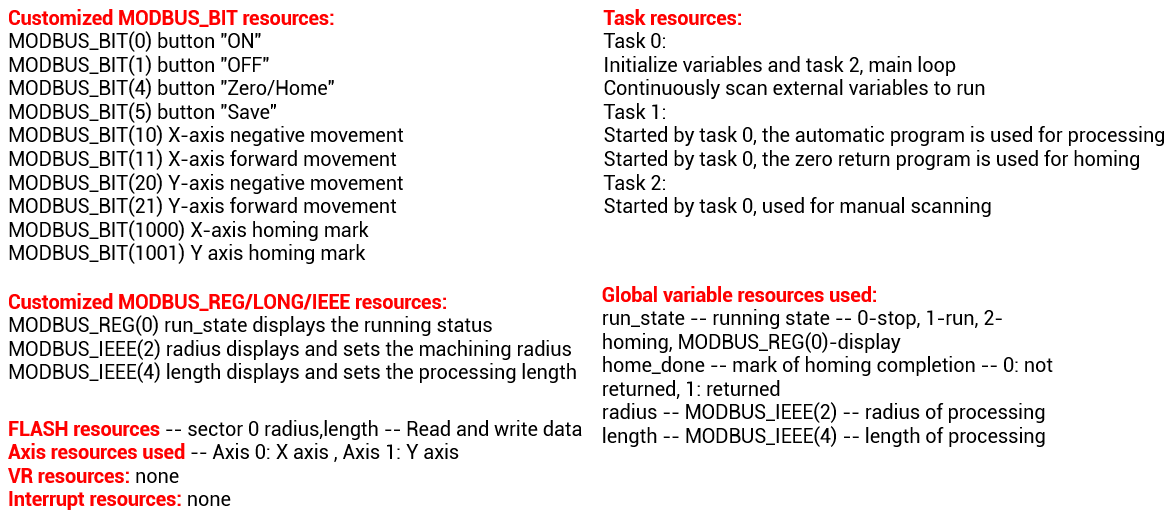
c. resources
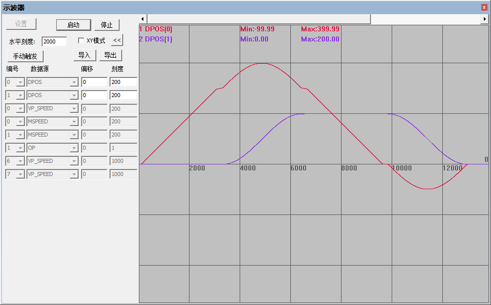
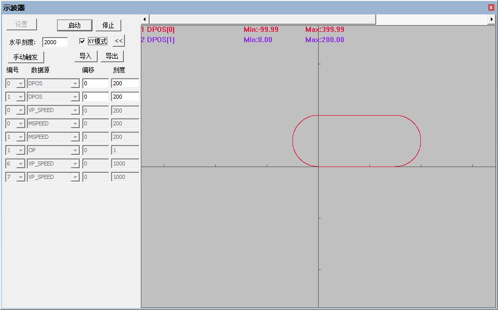
C. Program Effect
Open task 1 to run auto-processing
Then, capture the trajectory through oscilloscope.
Curve 0 (red one): demand position DPOS of axis 0 | DPOS (0)
Curve 1 (purple one): demand position DPOS of axis 1 | DPOS (1)
ABOUT ZMOTION
That's all, thank you for your reading -- Motion Control Quick Start (4) | How to Communicate Zmotion Controller with HMI
For more information, please pay close attention to "Support" and "Download" , and there are other platforms about Zmotion - Youtube & LinkedIn & Twitter & Tiktok & Facebook, including technical information (development environment, routine code), product showing, company development, etc.
Hope to meet you, talk with you and be friends with you. Welcome!
This article is edited by ZMOTION, here, share with you, let's learn together.
ZMOTION: DO THE BEST TO USE MOTION CONTROL.
Note: Copyright belongs to Zmotion Technology, if there is reproduction, please indicate article source. Thank you.
Zmotion Technology focuses on development of motion control technology and general motion control products, it is a national high and new technology enterprise. Due to its concentration and hard work in motion control technology, ZMOTION already become one of the fastest growing industrial motion control companies in China, and is also the rare company who has managed core technologies of motion control and real time industrial control software completely. Here, Zmotion provides motion controller, motion control card, vision motion controller, expansion module and HMI. In addition, there is one program software developed by Zmotion -- ZDevelop. It is a good choice for you to program and compile. And program through upper computer, there is PC manual.