


From the title, you could get some information, right ?
Then, in this technical support article, rapidly achieve "single-axis / multi-axis synchronous following" function through MOVESYNC instruction will be introduced.
This function is applied in some commonly-used mechanical structures, such as, XYZ(R), SCARA, DELTA, etc., and it is widely used in assemble line dispensing, assemble line production sorting, assemble line carrying, etc.
After read this article, you will learn more about theory and achievement method of synchronous following, then, work efficiency in your area can be promoted in a way.
Now, let's begin!
As it is mentioned before, this synchronous following function is achieved mainly by MOVESYNC command. Actually, this instruction is convenient for users to quickly realize the function of single-axis or multi-axis synchronous following through the program, and realizes the grasping and placement of multiple belts. Also, according to its classification, it belongs to a kind of cam instruction.
We has known the achievement instruction of the synchronous following, but what the function mainly does? This synchronous following function can rapidly control motion institution, achieve product synchronization and following in production line, then can assist other motion commands to realize product line products grasping, sorting, dispensing and other functional requirements.
Common scenarios: assembly line dispensing, assembly line product sorting, assembly line product handling, etc.
Common mechanical structures: XYZ (R), SCARA, DELTA, etc.
(1) Command Introduction
Synchronous following refers to the following of the point, specifically, the following is the position. The operator coordinates the position relationship between the position of the belt and the following axis. What needs to be processed is only the position of the first following moment.
In the MOVESYNC command, there are important parameters that are mainly to give the position of the belt and the position of the following axis. It is only necessary to statically process the "moment" of the following point, that is, it can be imagined that the belt stops when the object on the belt reaches the position of the sensor "mark".
At this time, the following axis moves to the product mark point, and two sets of coordinate positions are obtained at this moment:
Group 1: the syncposition of the belt position.
Group 2: the position pos1 of the following axis.
Then, it only needs to fill in these two positions correspondingly into the instruction, and the operator will automatically calculate and plan the positions of the two to ensure that they are relatively stationary.
(2) Command Function Grammar
MOVESYNC(mode,synctime,syncposition,syncaxis,pos1[,pos2, pos3…])
It supports single-axis or multi-axis synchronous following.
(3) Command General Usage Format
base(0,1,2) //specify the axis No. that participates synchronous following, here, take 0, 1, 2 as the example.
MOVESYNC (mode,acceleration time,syncposition,syncaxis,pos1,pos2, pos3) //acceleration
MOVESYNC(mode,synchronous time,syncposition,syncaxis,pos1,pos2, pos3) //synchronization
MOVESYNC(mode,deceleration time,syncposition,syncaxis,pos1,pos2, pos3) //deceleration (reset)
It can be seen there are 3 steps for one full following process. Firstly, processing head accelerates to reach the same speed of belt, which means synchronous motion is achieved, in this synchronization, complete processing operation. Then, processing head returns to waiting position, waiting for next to trigger processing. Next, it uses the sensor to detect the materials, recording the material position, filling in MOVESYNC instruction.
(4) Command Parameters Description
--mode: mode
In acceleration and synchronization stages, mode 0 is used usually. And generally, it follows in axis X direction, and uses mode -2 in deceleration stage (it can finish compulsively the former following motion)
mode -1: synchronization end mode, it runs to assigned absolute position. If there is other MOVESYNC commands behind this mode, this will be covered, and syncaxis is invalid in this mode.
mode -2: forced end mode, when it is called, it will stop compulsively the original MOVESYNC, it runs to assigned absolute position. If there is other MOVESYNC commands behind this mode, this will be covered, and syncaxis is invalid in this mode.
mode 0: the first axis (x) of BASE follows belt axis object.
mode 10: the second axis (y) of BASE follows belt axis object.
mode 20: the third axis of BASE follows belt axis object.
Special note: when there is an angle between the following production line and the machine, use mode 0, and add the radian value of the angle between the machine and the production line to realize tracking deflection compensation, for example:
mode=0+angle, angle: belt rotation angle, angle = positive rotation angle between the belt and the axis 1/2 of BASE. For example:
① Mode=PI/4, the belt is in the direction of 45 degrees.
② Mode=PI/2, the belt is in the y direction.
③ Mode=PI, the belt is in the negative direction of x.
④ Mode=(PI*1.75), the belt is in the direction of -45 degrees.
--synctime: synchronous time, time unit is ms, there are 3 parts for the synchronization.
Acceleration: how long is the acceleration period means that the machine follows the axis to accelerate to the production line speed and keeps up with the target product. 0 means to estimate the synchronization time according to the speed acceleration of the motion axis, which may not be accurate. Generally, it should be set longer to ensure that synchronization can be achieved.
Synchronization: the synchronization segment time indicates how long it takes to follow the movement of the product, and during this synchronization, some actions, such as grabbing are completed, and generally the time is set to be relatively long to ensure that the action is completed.
Deceleration: the deceleration period indicates how long it takes to return to the specified position. Generally, the deceleration period is the same as the acceleration period. It is recommended to use -2 mode.
--syncposition: the belt axis position when the object on belt axis is detected.
Special note: this command supports the belt axis coordinate cycle, but when the command is called, make sure that there is no coordinate modification or cycle operation between the parameter position and the current belt axis position, so when this command is called, it should not be near the coordinate cycle point.
--syncaxis: belt axis No., -1 means there is no belt axis, it can be a motor axis or an encoder
--pos1: the absolute position of the first axis of BASE (usually the following axis) when the belt axis object is sensed
--posn: the absolute position of the nth axis of BASE when the belt axis object is sensed
(5) Command Usage Diagram (single-axis)
The movesync command only needs to give the position parameters of several axes when the synchronous follow is triggered, as the condition for starting the synchronous following, and then execute the machining after the acceleration reaches the synchronization.
First conceive and build a following model, as follows:
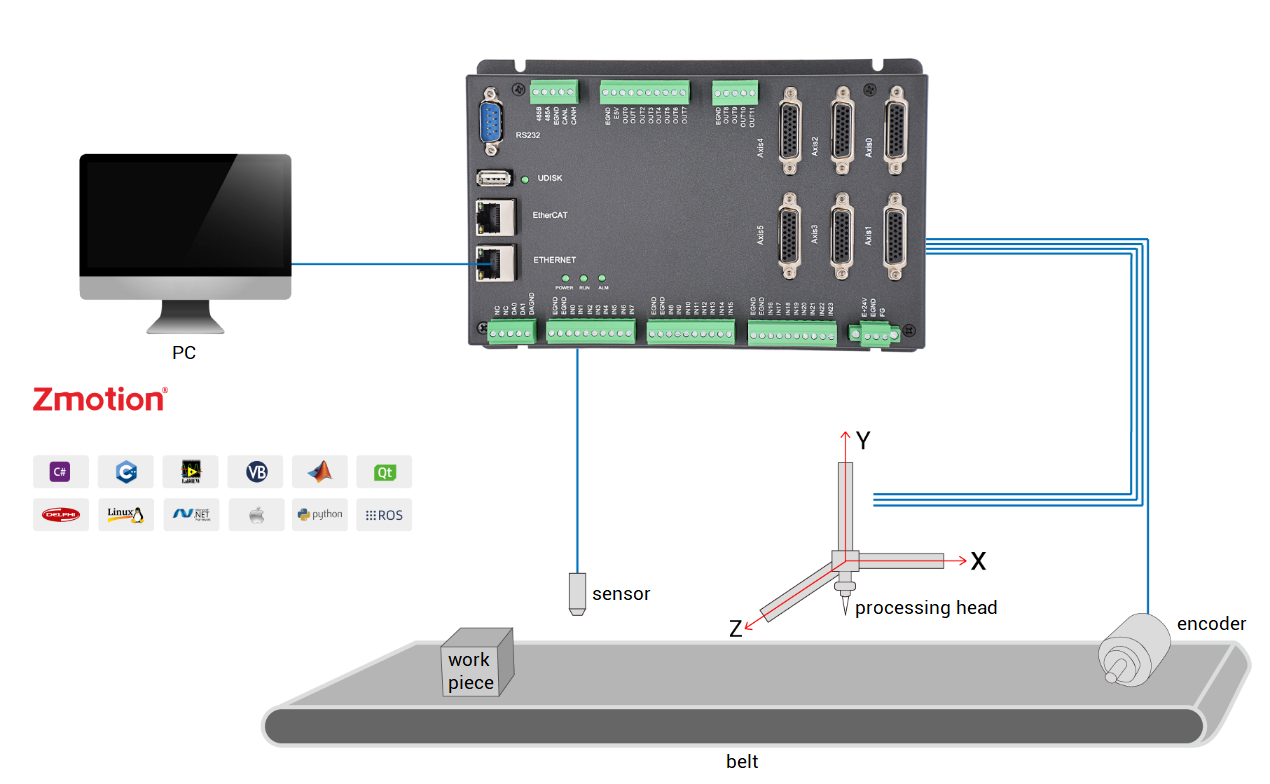
Assume that following is realized when the product arrives at the sensor position, then the belt position latch is realized by means of the signal of the sensor, that is, when the product reaches the position where the sensor is latched, the belt coordinate (syncposition parameter) is recorded by the latch, and at this time, the following axis X runs to the position of the product latch point, then gets the X-axis position of the following axis as (pos1).
In this way, the coordinate position in the MOVESYNC command is obtained, that is, the position of the belt at the synchronization moment (syncposition), the position of the following axis (pos1), and then plan the time of the acceleration section, the time of the synchronization section and the time of the deceleration section according to the actual operation situation, the command can be executed to realize a synchronous follow-up process.
Below take the single-axis following as the example, assist the sensor to record the position.
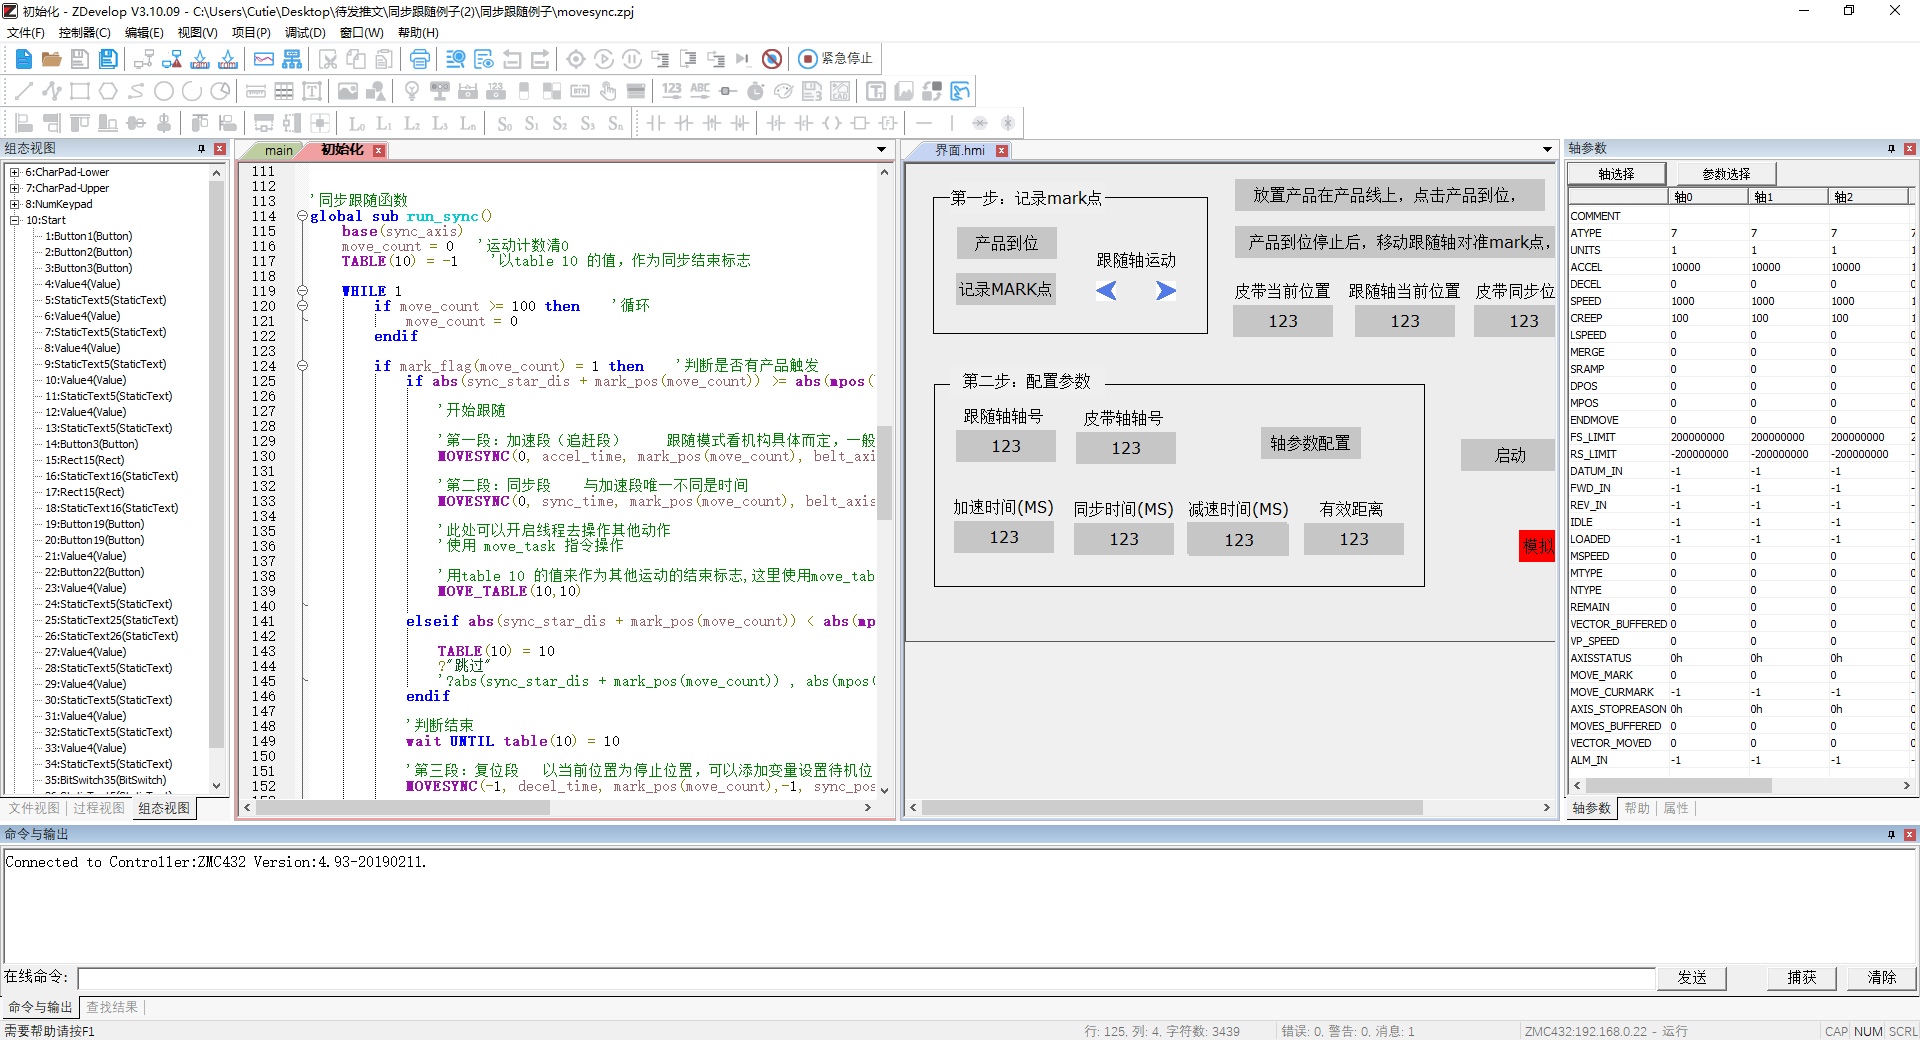
When there is no machine, latch signal can be given manually to simulate detecting materials, and record the position information that needs to be filled in synchronous motion command. In HMI interface, click "ON" to start executing synchronization motion. The main function calling relationship of program is shown as below.
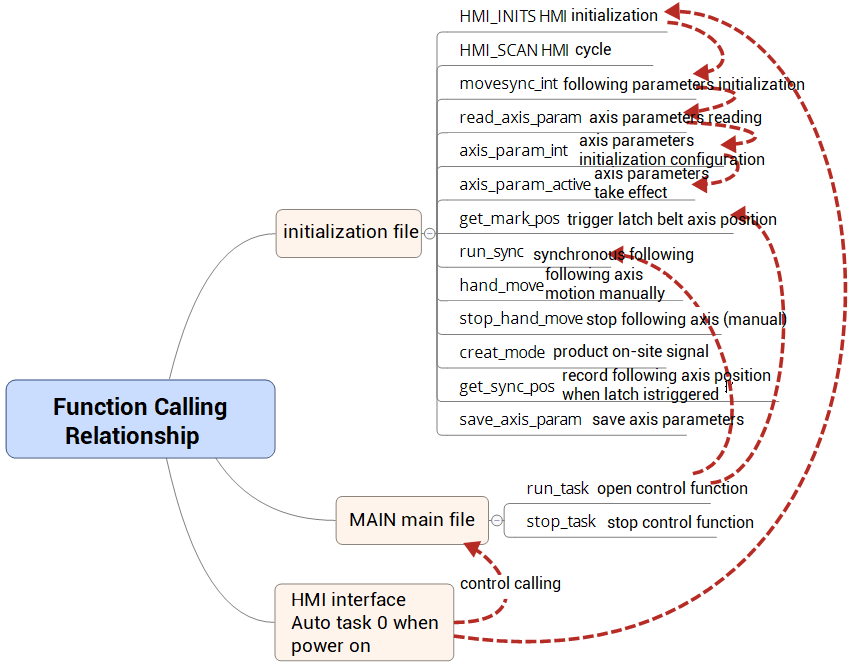
Configure HMI interface to operate conveniently, it can modify axis parameters, flexibly adjust each time of synchronous following, then operate following axis through manual motion to wait for the position that triggers synchronous motion and record the current position of following axis. Next open belt axis motion, and give sensor signals during moving, then synchronous motion is triggered, also following axis completes one synchronous following action under MOVESYNC command control.
This interface shows positions of belt axis and following axis, and it is convenient to configure axis basic parameters, acceleration, synchronization and deceleration time of synchronou motion.
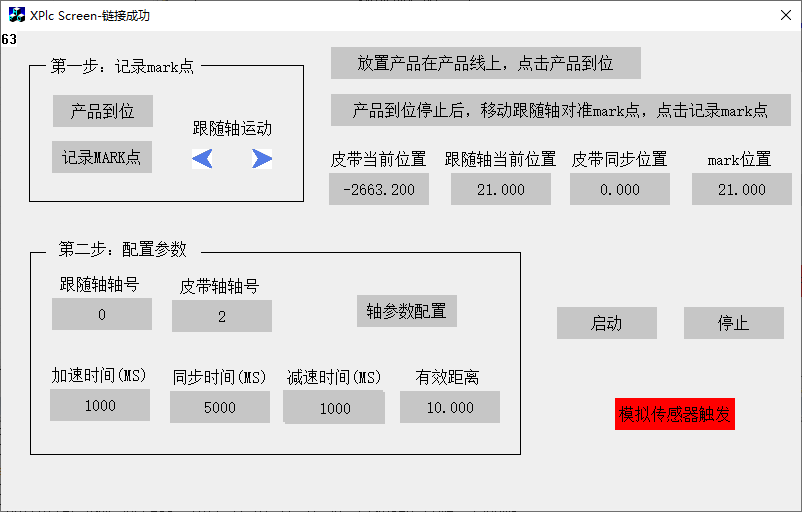
HMI operation steps:
For the first run, alignment operation is required, confirm the position of the following axis, click "product arrival", the simulated product is placed on the conveyor belt and start to move, stop when it reaches the latch position, and move the following axis to the product position to stop. Record the coordinates of the following axis at this time, which will be used by the MOVESYNC command.
Configure the axis No. and the motion parameters of the axis, and reasonably set the time of the three-segment motion.
Click "ON", the conveyor belt runs, the incoming material detection signal is given through the analog signal, the trigger latch to obtain the coordinates of the belt axis, and the trigger synchronization to start.
Note: because this routine uses the hardware latch function, it needs to run on the controller platform. When there is no sensor, OUT port can be connected to the IN port, and use the OP command to simulate the input of the sensor latch signal. The example connects OUT0 to IN0.
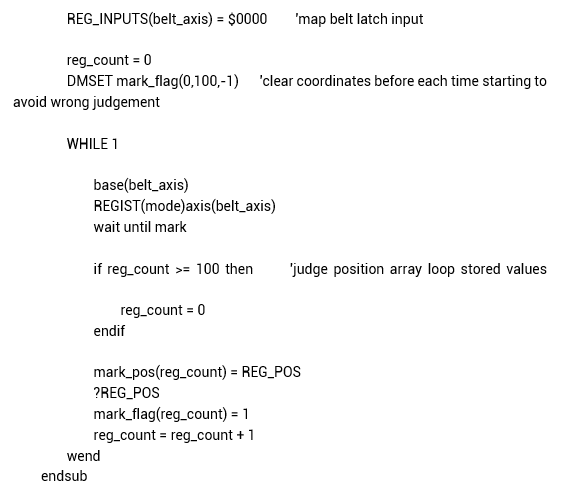
Latch function: rely on the latch sensor to detect incoming materials, trigger synchronous follow-up movement, when the latch function record starts to follow, latch the position of the belt axis, record the position information of the current synchronous axis, and pass in the parameters of the MOVESYNC command.
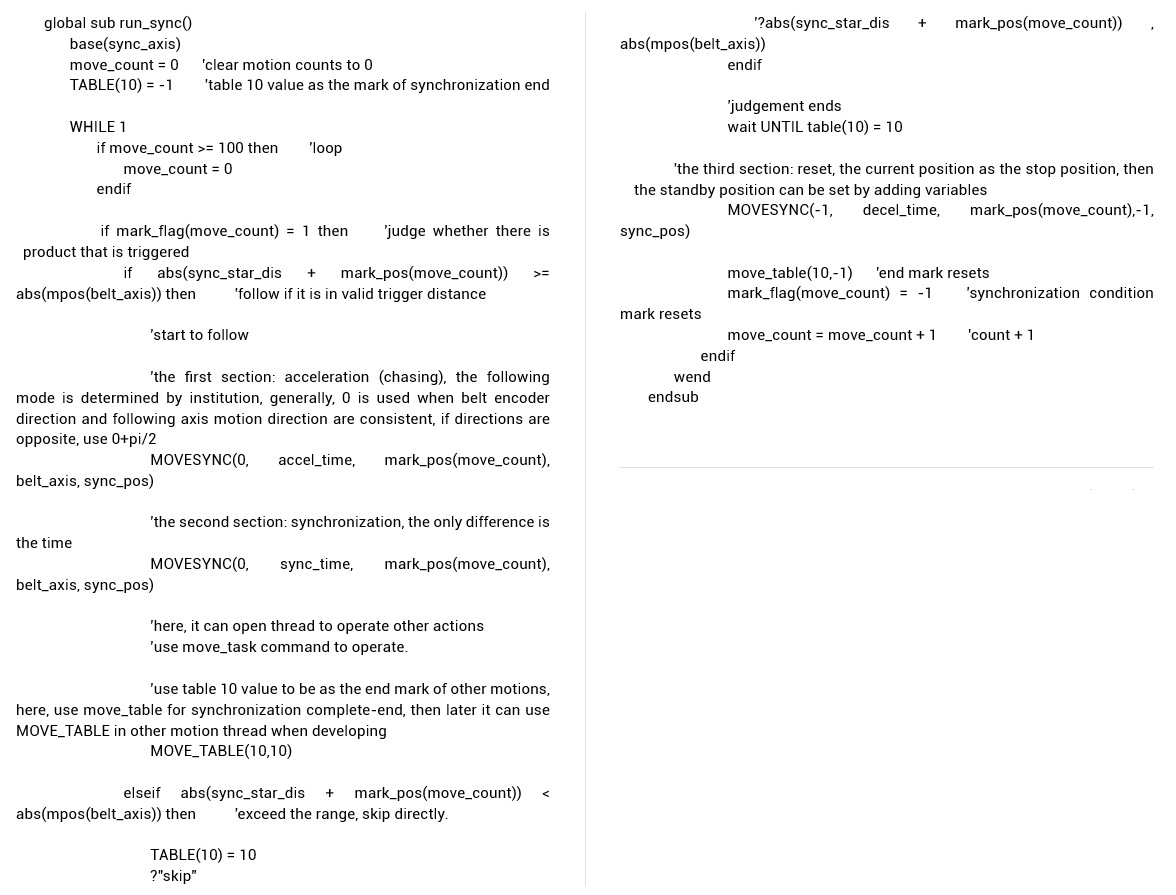
Synchronous following function: rely on the parameters given by the latch function, set following time, execute synchronous following actions, there are acceleration, synchronization and deceleration three stages. Please pay attention to plan each time reasonably, waiting for next trigger to follow after completed one following steps.
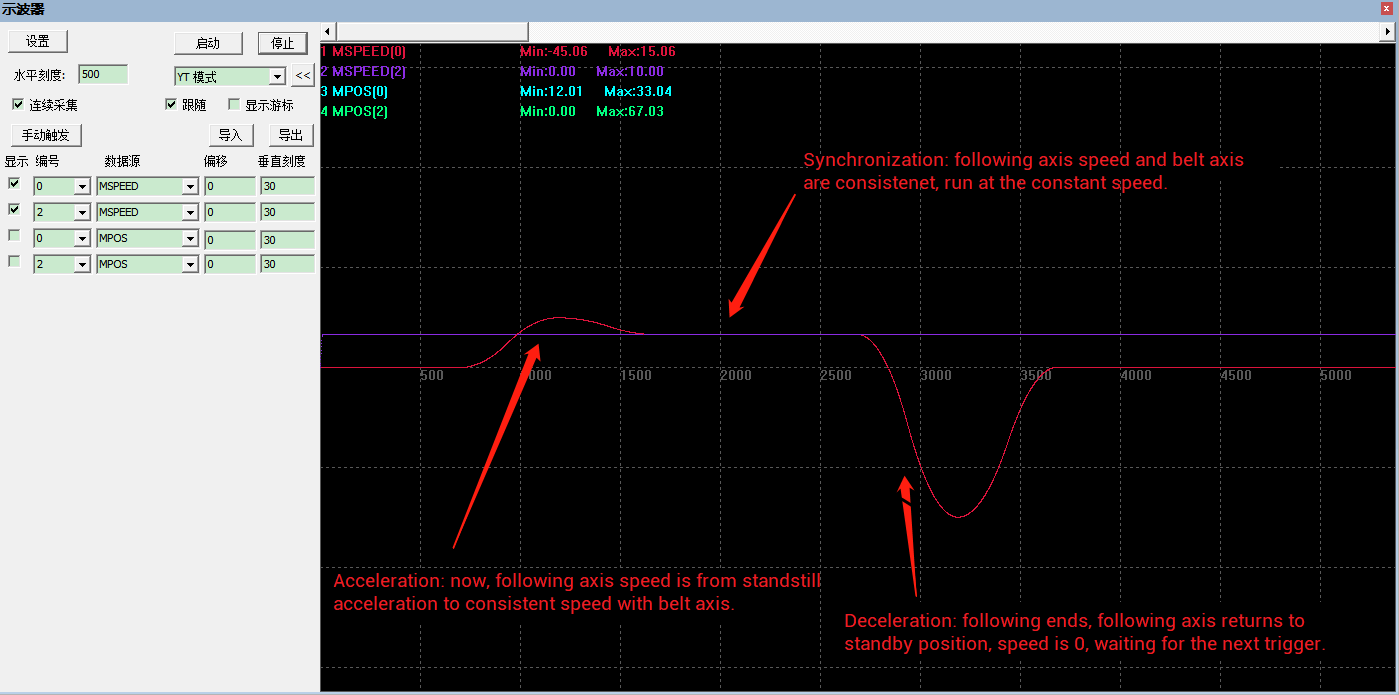
Following axis (axis 0) follows belt axis (axis 2).
Speed curve: acceleration, synchronization, deceleration (back to the starting point)
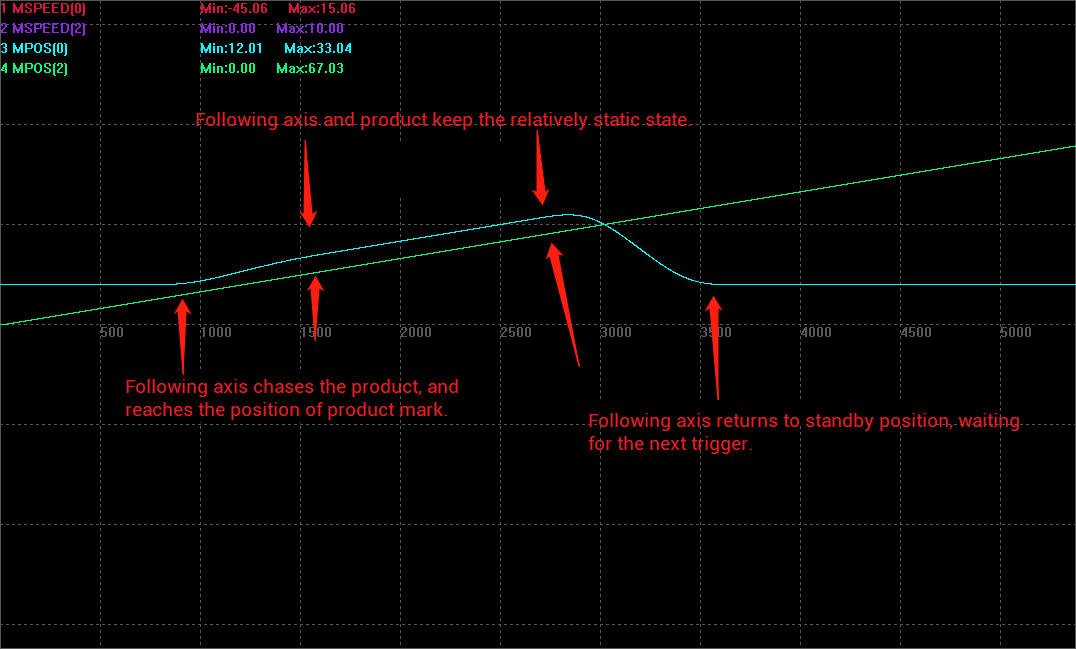
Following axis (axis 0) follows belt axis (axis 2).
Position curve:
ABOUT ZMOTION
That's all, thank you for your reading -- How To Rapidly Achieve Single-Axis / Multi-Axis Synchronous Following Function For Zmotion Motion Controller。
For more information, please pay close attention to "Support" and "Download" , and there are other platforms about Zmotion - Youtube & LinkedIn & Twitter & Tiktok & Facebook, including technical information (development environment, routine code), product showing, company development, etc.
Hope to meet you, talk with you and be friends with you. Welcome!
This article is edited by ZMOTION, here, share with you, let's learn together.
ZMOTION: DO THE BEST TO USE MOTION CONTROL.
Note: Copyright belongs to Zmotion Technology, if there is reproduction, please indicate article source. Thank you.
Zmotion Technology focuses on development of motion control technology and general motion control products, it is a national high and new technology enterprise. Due to its concentration and hard work in motion control technology, ZMOTION already become one of the fastest growing industrial motion control companies in China, and is also the rare company who has managed core technologies of motion control and real time industrial control software completely. Here, Zmotion provides motion controller, motion control card, vision motion controller, expansion module and HMI. In addition, there is one program software developed by Zmotion -- ZDevelop. It is a good choice for you to program and compile. And program through upper computer, there is PC manual.
Zmotion Technology provides motion control card, motion controller, vision motion controller, expansion module and HMI. ( more keywords for Zmotion: EtherCAT motion control card, EtherCAT motion controller, motion control system, vision controller, motion control PLC, robot controller, vision positioning...)
Have a good day, best wishes, see you next time.