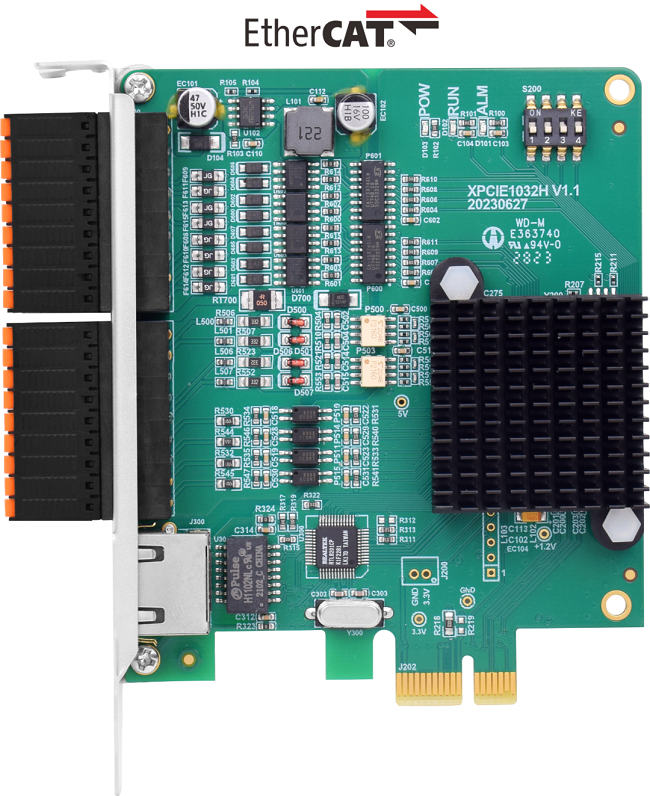
(1) Related Zmotion PC Motion Commands
Through C# development, Zmotion provides one general PC motion control commands.
Download Add.:https://www.zmotionglobal.com/download_list_17.html
Contact Us:https://www.zmotionglobal.com/contactus.html
A. ZAux_FastOpen: connect to controller
B. ZAux_Direct_GetAtype: read assigned axis’ type
C. ZAux_Direct_SetAtype: set assigned axis’ type
D. ZAux_BusCmd_SDOWrite: SDO writing by node and slot
E. ZAux_BusCmd_SDORead: SDO reading by node and slot
F. ZAux_BasDown: one single .bas file generates ZAR file, then be downloaded into controller.
(2) C# Routine UI Interface
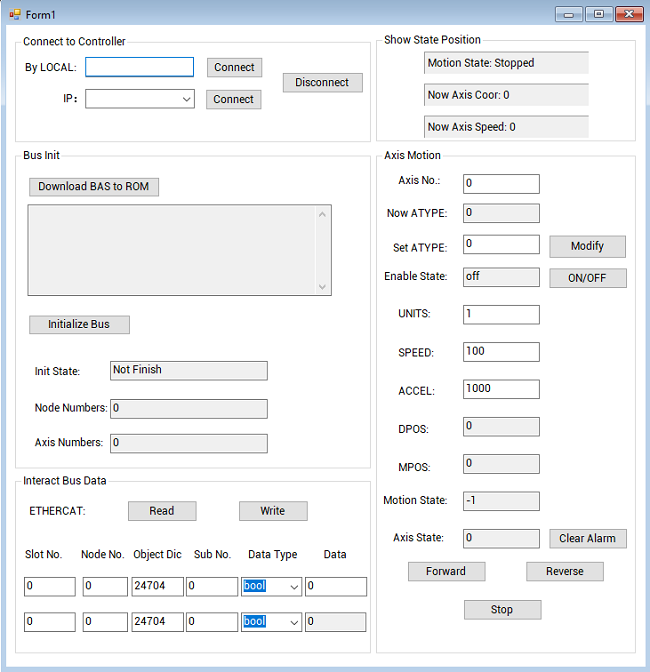
ATYPE: axis type
UNITS: pulse amount
SPEED: running speed
ACCEL: acceleration
DECEL: deceleration
DPOS: target position
MPOS: feedback position
(3) C# Routine Description
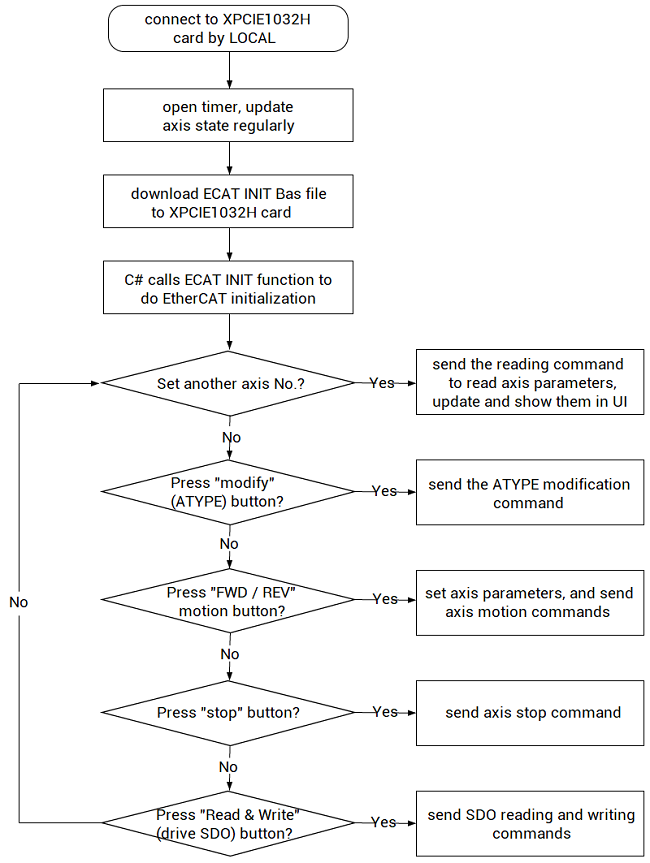
Step 1: Connect to Controller
Connect to XPCIE1032H motion control card through LOCAL, it is triggered by the click event of “connect” button.
private void button4_Click(object sender, EventArgs e)
{
    if (g_handle == (IntPtr)0)
    {
        C_Close_Card_Click(sender, e);
    }
    zmcaux.ZAux_FastOpen(5, comboBox1.Text, 1000, out g_handle);
    if (g_handle != (IntPtr)0)
    {
        this.Text = "Connected";
        timer1.Enabled = true;
        C_Move_Axis_TextChanged(sender, e);
    }
    else
    {
        MessageBox.Show("Controller Connect Failed, Please Choose Correct LOCAL!");
    }
}
Step 2: Do EtherCAT Initialization
For EtherCAT motion controller or motion control card, it needs to do EtherCAT initialization at first.
Zmotion provides one standard EtherCAT initialization file for you, you only need to set several variables according to your real situation.
Download it into controller, then C# will call below function to complete EtherCAT initialization (trigger it by one click event, that is, press button “download bas file” to browse BASIC file to download it).
Note: it will automatically execute BASIC program to do EtherCAT initialization after downloading.
private void C_Download_Click(object sender, EventArgs e)
{
    if (g_handle == (IntPtr)0)
    {
        MessageBox.Show("No Controller Connected!", "Note");
    }
    else
    {
        int ret = 0;
        string strFilePath;
        OpenFileDialog openFileDialog1 = new OpenFileDialog();
        openFileDialog1.InitialDirectory = "\\";
        openFileDialog1.Filter = "Config File(*.bas)|*.bas";
        openFileDialog1.RestoreDirectory = true;
        openFileDialog1.FilterIndex = 1;

        if (openFileDialog1.ShowDialog() == DialogResult.OK)            //open coniguration file
        {
            strFilePath = openFileDialog1.FileName;
            C_BasFile.Text = strFilePath;
            ret = zmcaux.ZAux_BasDown(g_handle, strFilePath, 1);        //download into ROM
            if (ret != 0)
            {
                MessageBox.Show("File Download Faile!", "Note");
            }
            g_InitStatus = -1;
            g_basflag = true;
        }
    }
}
Notes:
If it is still in initialization, the state will be “not finish”, also, node numbers and axis numbers are 0. After initialized, state will be “initialized”, and corresponding nodes, axes will be shown.
While initializing, when it alarms due to out of hard position limit. Try to set FWD_IN and REV_IN as -1 in RTSys – Axis Parameter window, which means not to map. They can be set again after position limit switch is connected.
Step 3: Set Axis No.
Modify the global variable “m_axisnum” to set axis No., then corresponding axis parameters can be read and shown in routine.
private void C_Move_Axis_TextChanged(object sender, EventArgs e)
{
    if (g_handle == (IntPtr)0)
    {
        return;
    }
    int ret = 0;
    float[] f_AxisPara = new float[10];
    int m_atype = 0;
    m_axisnum = Convert.ToInt32(C_Move_Axis.Text);
    ret += zmcaux.ZAux_Direct_GetUnits(g_handle, m_axisnum, ref f_AxisPara[0]);
    ret += zmcaux.ZAux_Direct_GetSpeed(g_handle, m_axisnum, ref f_AxisPara[1]);
    ret += zmcaux.ZAux_Direct_GetAccel(g_handle, m_axisnum, ref f_AxisPara[2]);
    ret += zmcaux.ZAux_Direct_GetAtype(g_handle, m_axisnum, ref m_atype);

    if (ret == 0)
    {
        C_AxisType.Text = m_atype.ToString();
        C_AxisUnits.Text = f_AxisPara[0].ToString();
        C_AxisSpeed.Text = f_AxisPara[1].ToString();
        C_AxisAcc.Text = f_AxisPara[2].ToString();
    }
}
Step 4: Set ATYPE
Modify as correct axis type through ZAux_Direct_SetAtype (handle, axis No., atype).
private void button1_Click (object sender, EventArgs e)
{
if (g_handle == (IntPtr)0)
{
return;
}
int ret = 0;
int m_atype1 = 0;
m_atype1 = Convert.ToInt32(C_AxisType1.Text);
m_axisnum = Convert.ToInt32(C_Move_Axis.Text);
zmcaux.ZAux_Direct_SetAtype(g_handle, m_axisnum, m_atype1);
}
Step 5: Start & Stop Motion
a. Make one single axis move continuously forward / reverse through the function “ZAux_Direct_Single_Vmove (handle, axis No., direction)”.
private void C_Button_Fwd_Click(object sender, EventArgs e)
{
    if (g_handle == (IntPtr)0)
    {
        MessageBox.Show("No Controller Connected!", "Note");
        return;
    }
    int ret = 0;
    ret = zmcaux.ZAux_Direct_SetUnits(g_handle, m_axisnum, Convert.ToSingle(C_AxisUnits.Text));
    ret = zmcaux.ZAux_Direct_SetSpeed(g_handle, m_axisnum, Convert.ToSingle(C_AxisSpeed.Text));
    ret = zmcaux.ZAux_Direct_SetAccel(g_handle, m_axisnum, Convert.ToSingle(C_AxisAcc.Text));
    ret = zmcaux.ZAux_Direct_Single_Vmove(g_handle, m_axisnum, 1);
}
b. Stop one single axis motion through the function “ZAux_Direct_Single_Cancel (handle, axis No., mode)”.
private void C_Button_Stop_Click(object sender, EventArgs e)
{
    if (g_handle == (IntPtr)0)
    {
        MessageBox.Show("No Controller Connected!", "Note");
        return;
    }
    int ret = 0;
    ret = zmcaux.ZAux_Direct_Single_Cancel(g_handle, m_axisnum, 2);
}
Step 6: Read & Set Real ATYPE of Expanded Axis by EIO16084
After initialized, expanded bus axis will be 65 (ATYPE=65 – CSP mode, cycle position mode). However, it is not real type because of pulse drive.
At this time, use data dictionary6011h to restore the real type.
C# Interface: ZAux_BusCmd_SDORead (connection handle, slot, node, data dictionary No., object dictionary sub-No., data type, data value to be read).
For example, axis 6 and axis 7 are shown as 65 after EtherCAT initialized, but it can be seen they are not correct and not the same by reading 6011h and 6011h+1*800h.
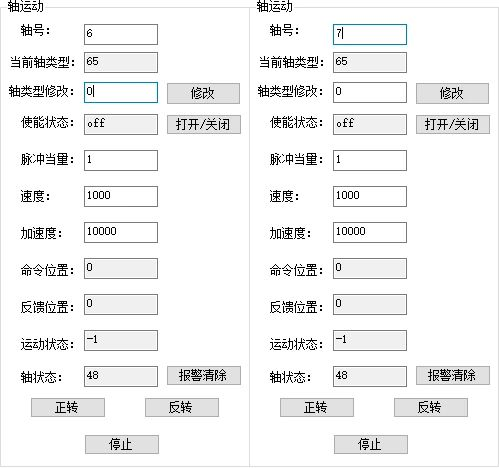
As for axis 6, the returned value is 7. The real ATYPE is pulse directional stepper / servo + EZ input.
As for axis 7, the returned value is 0. The real ATYPE is virtual axis.
private void C_Sdo_Read_Click(object sender, EventArgs e)
{
    if (g_handle == (IntPtr)0)
    {
        MessageBox.Show("No Controller Connected!", "Note");
        return;
    }
    int ret = 0;
    uint m_sdo_slot2 = Convert.ToUInt32(C_SdoSlot1.Text);
    uint m_sdo_node2 = Convert.ToUInt32(C_SdoNode1.Text);
    uint m_sdo_index2 = Convert.ToUInt32(C_SdoReg1.Text);
    uint m_sdo_sub2 = Convert.ToUInt32(C_SdoIsub1.Text);
    uint m_sdo_type2 = Convert.ToUInt32(C_SdoType1.SelectedIndex.ToString()) + 1;
    int m_sdo_data2 = 0;
    if (Bus_type == 0)
    {
        ret = zmcaux.ZAux_BusCmd_SDORead(g_handle, m_sdo_slot2, m_sdo_node2, m_sdo_index2, m_sdo_sub2, m_sdo_type2, ref m_sdo_data2);
        if (ret != 0)
        {
            MessageBox.Show("Read Failed");
            return;
        }
        C_Sdodata1.Text = m_sdo_data2.ToString();
    }
    else
    {
        MessageBox.Show("Non-ETHERCAT Module");
        return;
    }
}
C# Interface: ZAux_BusCmd_SDOWrite (connection handle, slot, node, data dictionary No., object dictionary sub-No., data type, data value to be written).
For example, write axis 6 as ATYPE 4 (pulse directional output + quadrature encoder input).
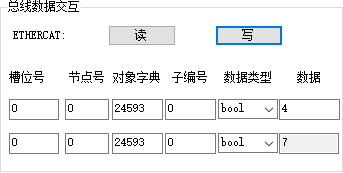
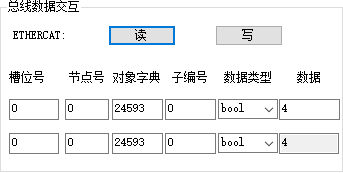
Now, read ATYPE again. it becomes 4.
Next, axis 6 DPOS and MPOS are not same, because no encoder connects to axis 6, MPOS is 0.
private void C_Sdo_Write_Click(object sender, EventArgs e)
{
    if (g_handle == (IntPtr)0)
    {
        MessageBox.Show("No Controller Connected!", "Note");
        return;
    }
    int ret = 0;
    uint m_sdo_slot1 = Convert.ToUInt32(C_SdoSlot0.Text);
    uint m_sdo_node1 = Convert.ToUInt32(C_SdoNode0.Text);
    uint m_sdo_index1 = Convert.ToUInt32(C_SdoReg0.Text);
    uint m_sdo_sub1 = Convert.ToUInt32(C_SdoIsub0.Text);
    uint m_sdo_type1 = Convert.ToUInt32(C_SdoType0.SelectedIndex.ToString()) + 1;
    int m_sdo_data1 = Convert.ToInt32(C_Sdodata0.Text);
    if (Bus_type == 0)
    {
        ret = zmcaux.ZAux_BusCmd_SDOWrite(g_handle, m_sdo_slot1, m_sdo_node1, m_sdo_index1, m_sdo_sub1, m_sdo_type1, m_sdo_data1);
        if (ret != 0)
        {
            MessageBox.Show("Write Failed");
            return;
        }
    }
    else
    {
        MessageBox.Show("Non-ETHERCAT Module");
        return;
    }
}


