
Nice to meet you, my friends.
As we mentioned in last article, how to use Zmotion basic language to configure handwheel application. And as we all know, there are two ways to develop, Zbasic and upper computer. Therefore, today, let's see how to call API function library interface through C++ to achieve handwheel configuration.
The handwheel is also called the hand pulse generator, which is mainly used for CNC equipment such as CNC machine tools, three-dimensional machining centers, horizontal machining centers, and gantry machining centers . When the handwheel rotates, the encoder generates the signal that corresponds to the movement of the handwheel, and then the coordinates are selected and positioned by the CNC (computer numerical control) system.
The manual pulse generator has an axial photoelectric encoding disk in the center, and there are ring-shaped and dark engraved lines on it. After shaking the handwheel, it is read by the photoelectric transmitting and receiving devices to obtain 2 sets of sinusoidal signals HA, HB, and there is one 90 degrees phase difference between each sinusoidal signal. Since the HA and HB signals differ by 90 degrees, the direction of pulse rotation can be selected to control the forward rotation or reverse rotation of the servo motor through choosing whether the A phase is in the front or the B phase is in the front according to the difference.

(1) Select the coordinate axis to be moved through the " axis selection knob" on the handwheel.
(2) Select the appropriate moving ratio (×1/×10/×100) through the "magnification selection knob".
(3) Rotate the " hand wheel crank" to move the coordinate axis. Clockwise rotation is forward movement, counterclockwise rotation is inverse movement, and the speed of rotation can control the movement speed of the coordinate axis.
(4) Press the button " emergency stop" to stop the movement of the handwheel in an emergency.
(5) The controller handwheel interface is a double-row standard DB15 female head, and the handwheel connector should be a double-row standard DB15 male head.
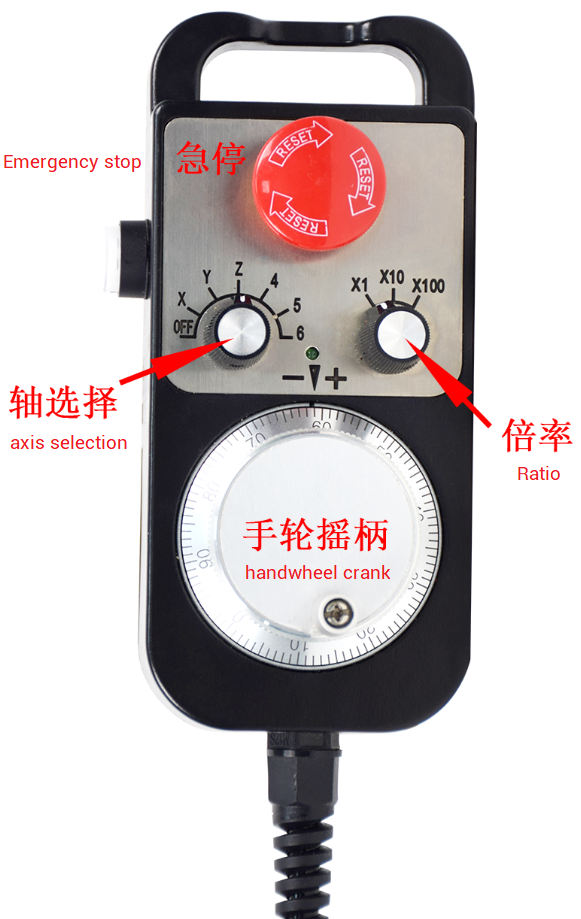
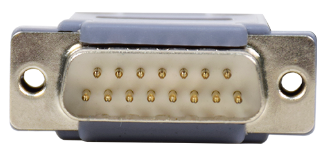
(1) handwheel introduction
Here, we take ZMC408CE motion controller as the example, because it has specified handwheel interface.
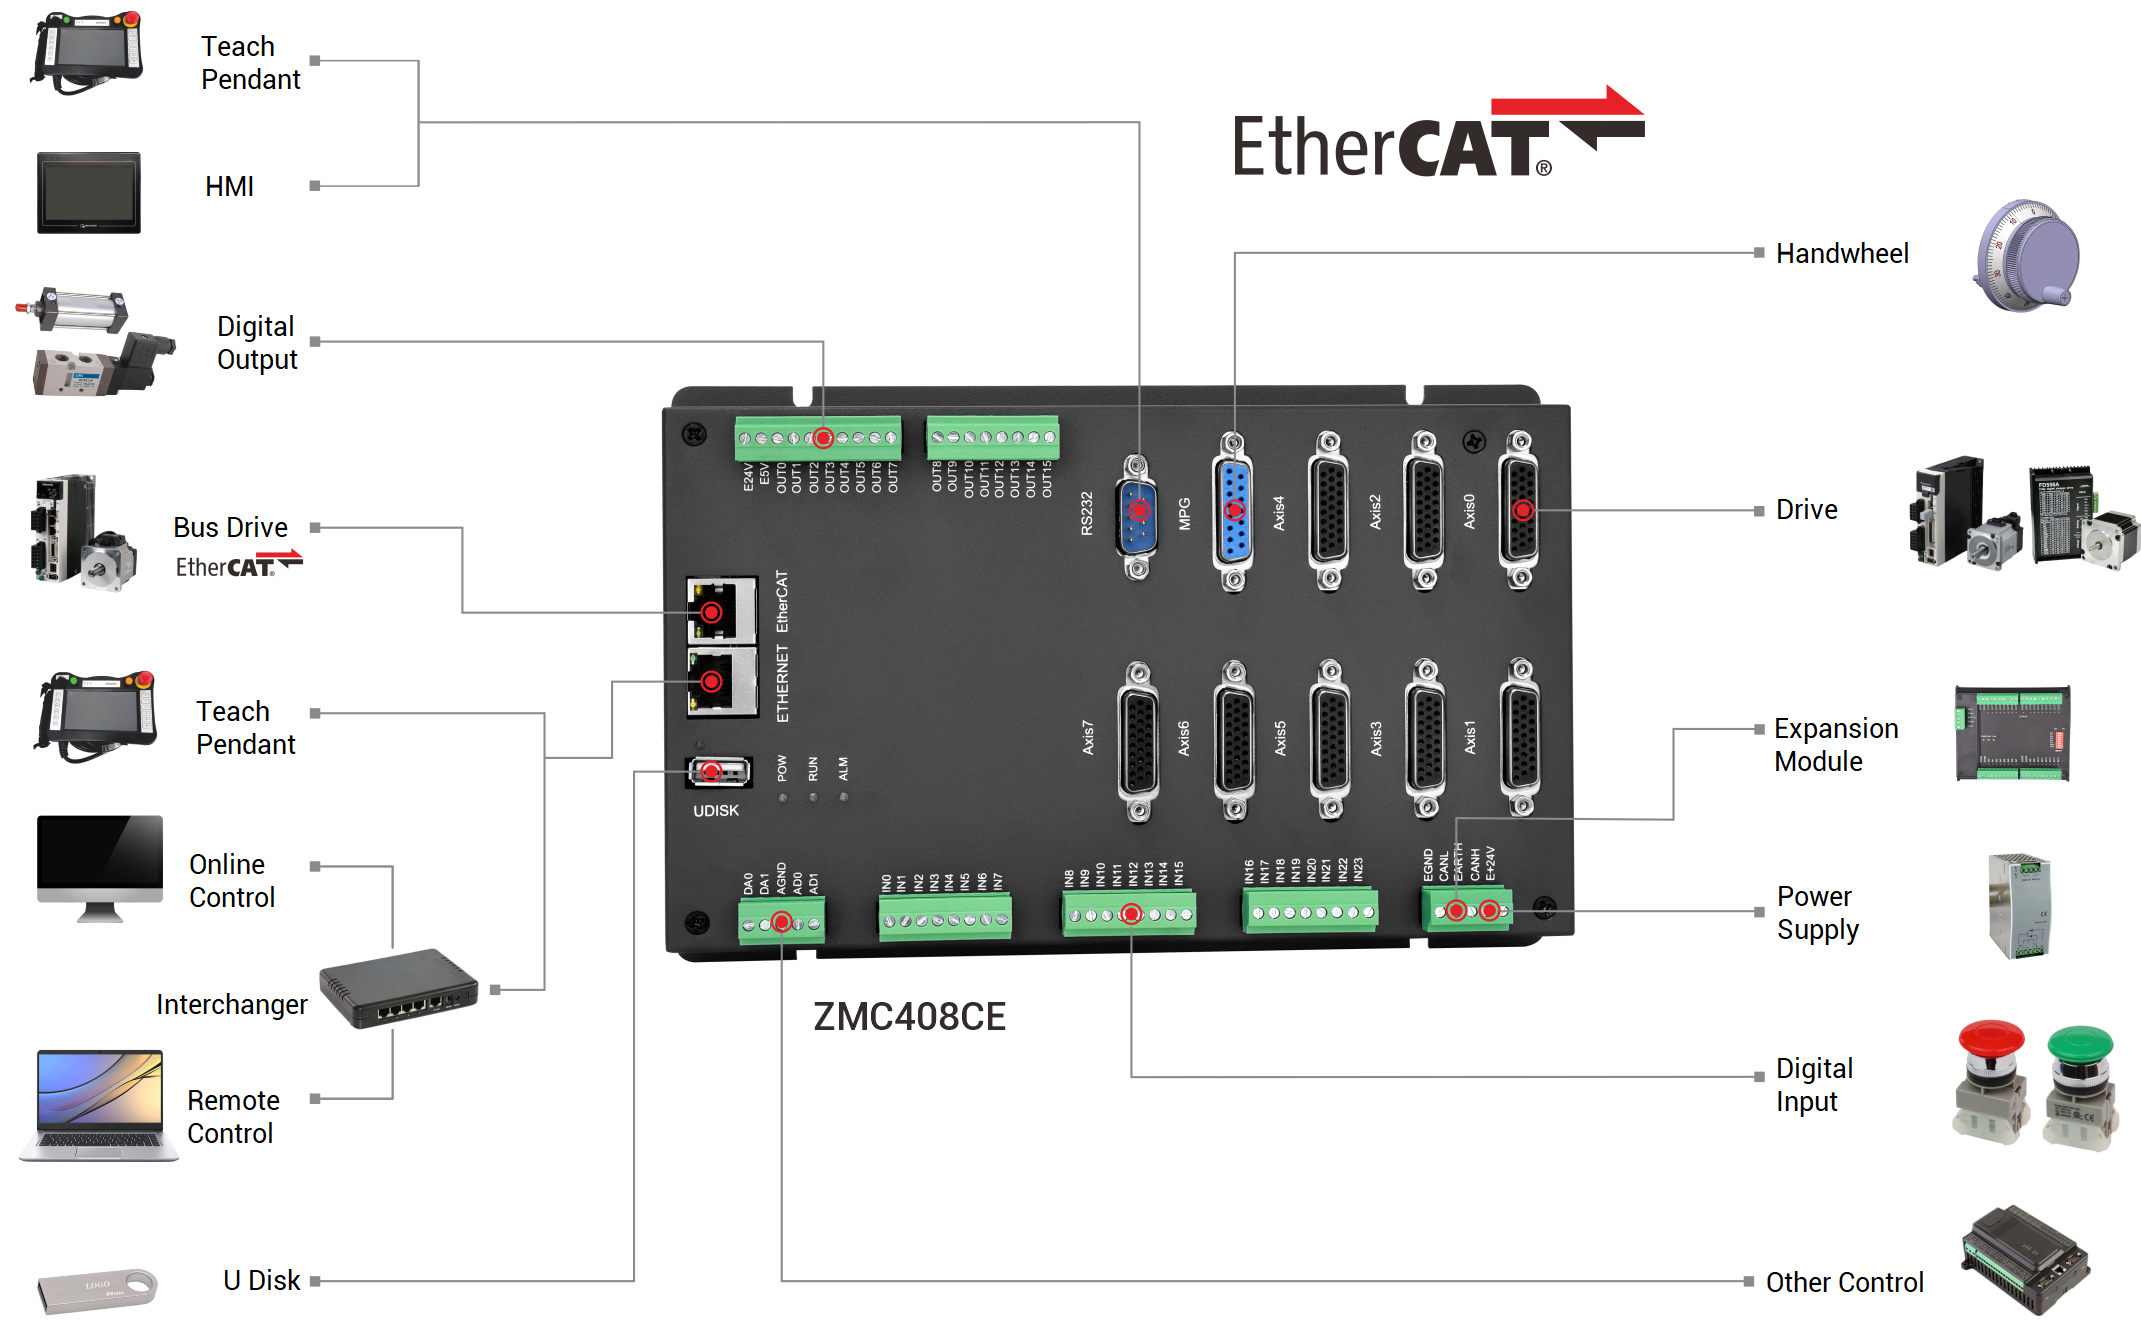
ZMC408CE is one high-performance EtherCAT bus motion controller launched by Zmotion technology. Advanced FPGA technology is used to achieve hardware position comparison output and precision output, to ensure excellent performance and stability of continuous trajectory processing, and to capture dynamic data in real-time, then in this way, control precisely can be realized and production efficiency and quality can be improved through our Zmotion ZMC408CE EtherCAT bus motion controller.
ZMC408CE supports mixed interpolation between EtherCAT and pulse axis. And it can run offline or online. Except mixed interpolation, it supports ZDevelop + multiple kinds of advanced host computer hybrid programming, then it can achieve point to point motion, electronic cam, linear interpolation, circular interpolation, continuous trajectory processing and 30+ robot models control.
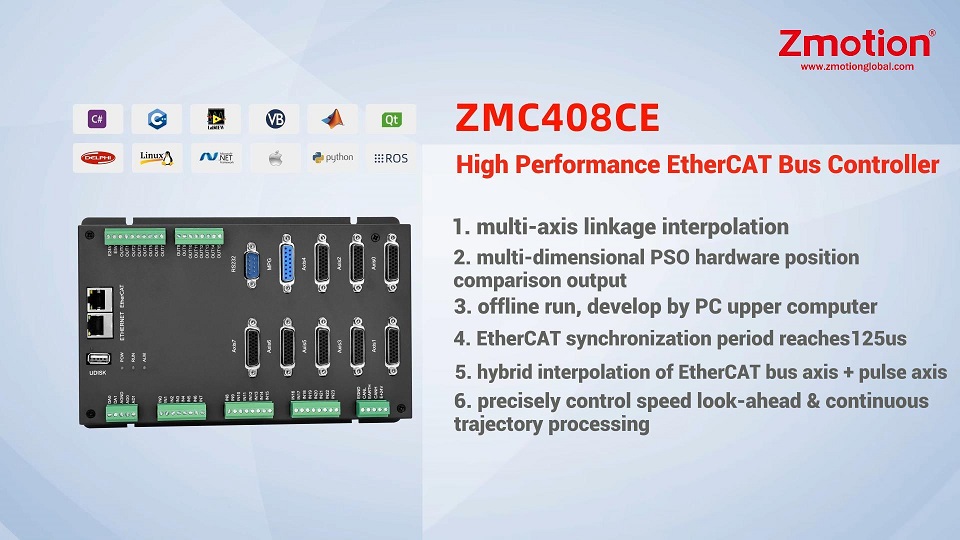
ZMC408CE Product Highlights
1. High-performance processor, computing speed, response time and scan cycle, etc. are can be improved.
2. One-dimensional / two-dimensional / three-dimensional, multi-channel visual flying shooting, high speed and high precision.
3. Position synchronization output " PSO", precise dispensing glue volume control and laser energy control in continuous trajectory processing.
4. Multi-axis synchronous control, multi-coordinate system independent control, etc.
5. EtherCAT synchronization cycle can reach 125us.
6. Support hybrid interpolation between EtherCAT bus and pulse axis.
7. Linear interpolation, circular interpolation in any space, helical interpolation, spline interpolation, etc.
8. Flexible application, it can be developed by PC host computer, and can also run independently offline.
(2) controller handwheel MPG introduction
--definition--
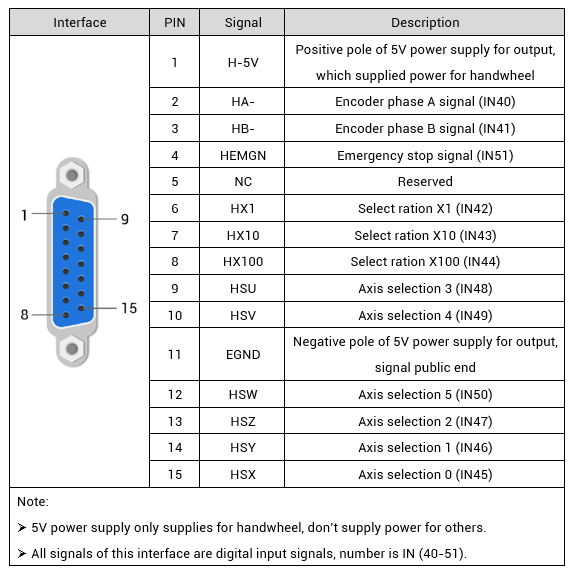
--wiring reference--
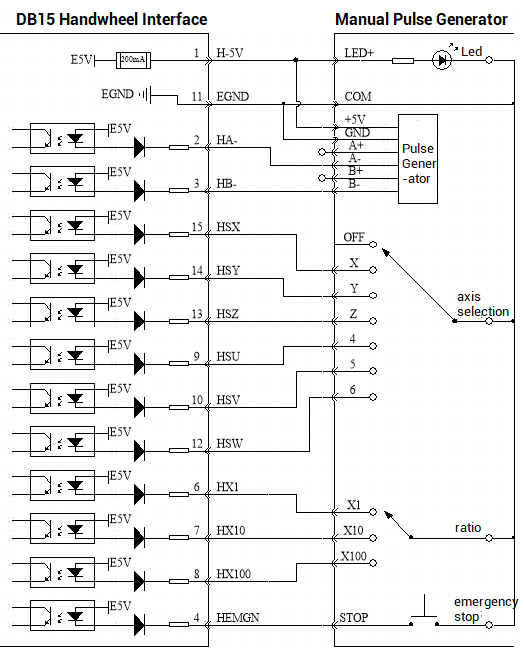
(3) notes
The wiring principle of the handwheel encoder axis is shown in the figure above. The designs of the handwheel manufacturers are various. Please check the design drawing inside the handwheel first and then confirm the correctness with the motion controller before wiring carefully. Please use STP (twisted-pair shielded) wires, especially If the environment is harsh, the shielding layer must be fully grounded.
NO.04
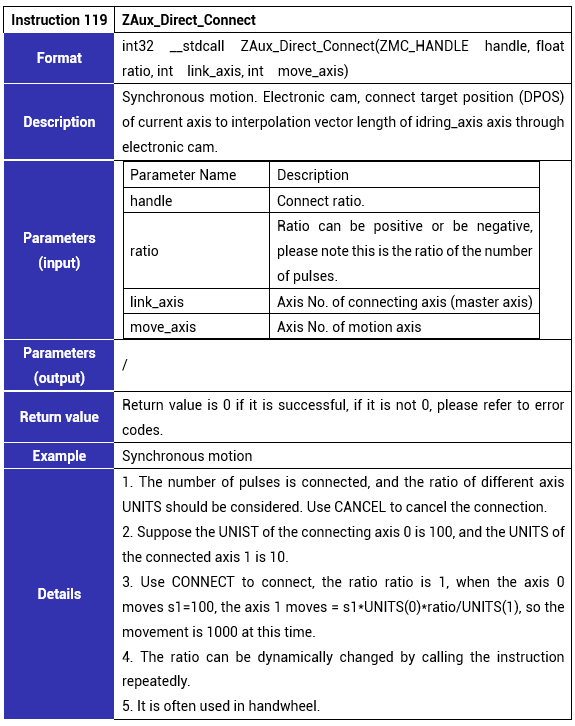
Use ZAux_Direct_Connect command to connect the handwheel to motion axis, the instruction is described in below form.
(1) Configuration Steps
--Refer to the above handwheel wiring diagram to connect the handwheel and controller correctly.
--Please contact us to download the routine, and use Visual Studio 2022 to open the C++ handwheel motion routine. After running, select any interface such as EtherNET, serial port, PCI, or LOCAL to connect to the controller according to the model.
-- Configure the axis No., different controller models have different handwheel axis numbers, ratio and axis selection IN numbers. For details, please refer to the corresponding controller user manual. And the controller model used in this example is ZMC408CE, the axis No. of the handwheel interface is 8, and there is no default AXIS axis number available for the handwheel interface of ZMC408CE motion controller, and it must be mapped before it can be used. Please note the mapping should avoid the pulse axis No. This routine is to map the handwheel into axis 10.
-- Configure IO, assign axis selection (HSX, HSY, HSZ, HSU) and ratio (HX1, HX10, HX100) and emergency stop (HEMGN) functions according to needs, these signals are essentially digital input signals with fixed No., but there is no fixed function, which needs to be developed through ZDevelop, and its name is the function of recommended configuration, the axis selection is the connected axis of connect synchronous motion, and the ratio is the connect ratio.
--After the above configuration is completed, the handwheel can be used.
(2) Program Running Interface
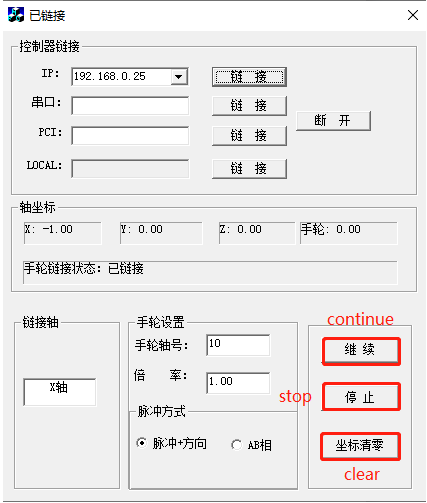
After the program runs successfully, below interface will appear. Before connecting to controller, axis coordinates and handwheel axis coordinates are 0 by default, and the handwheel state is "unconnected", handwheel axis No. is 10, link ratio is 1, handwheel axis pulse method is "pulse + direction", and the link axis is "unselected".
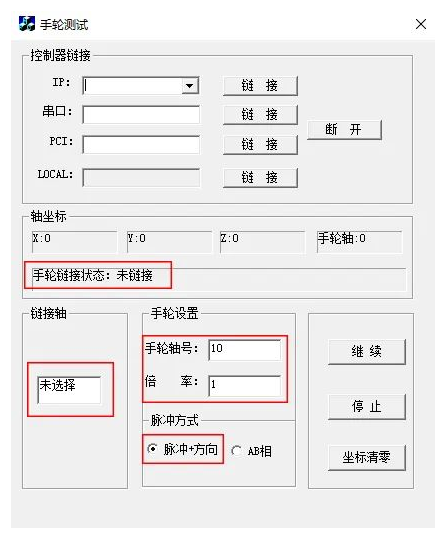
(3) Connect to controller
Select IP or serial port to connect to motion controller ZMC408CE. When the link is successful, handwheel test will become "connected", if it fails, one pop up window will appear and please click OK to close the window, check IP address or serial port address to connect again.
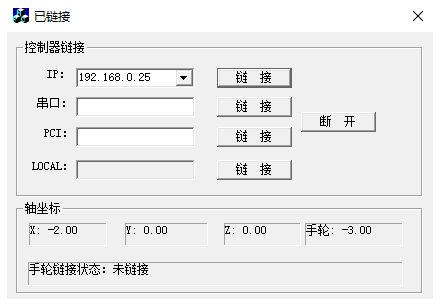
Success to connect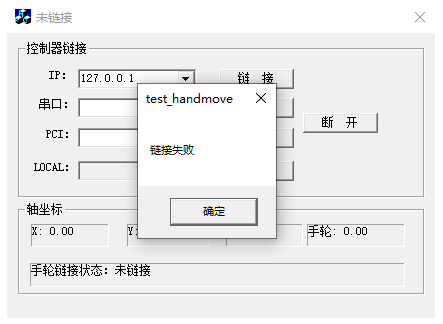
Fail to connect
(4) Operate handwheel axis
After the program is successfully linked to the controller, the axis coordinates and the position of the handwheel axis will be obtained. Select the linked axis through the "axis selection"rotary button of the handwheel. If the link is successful, the link status of the handwheel will change to "connected", and the linked axis will also display the linked axis No. and link ratio.
If you want to switch the connection axis and the link ratio, it only needs to rotate the handwheel "axis selection" button and "ratio" button. After clicking the stop button, the link will be automatically disconnected. At this time, the "axis selection" and "ratio" buttons of the handwheel are in an invalid state, and the link will only be re-linked after clicking "continue". It is recommended to select the link ratio before linking the axis. Otherwise, there may be a risk of collision. Click "clear" to reset all the coordinates of X, Y, Z, and handwheel to zero.
(5) Modify handwheel axis No.
From above, we could know the handwheel axis No. of this routine is bound to axis 10. But how to modify it ? Actually change it in handwheel configuration directly, including handwheel pulse method.
(6) Map handwheel axis No.
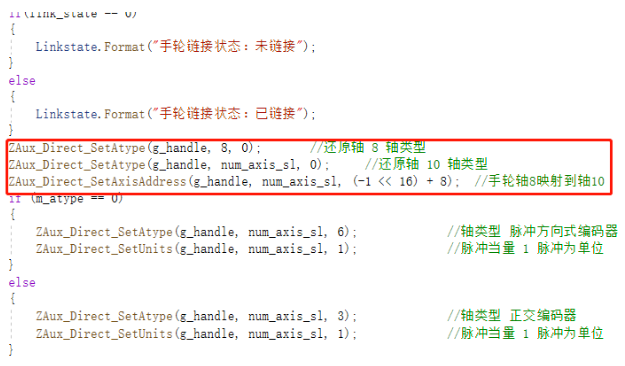
The default interface of the handwheel axis is different from different controllers, please refer to the controller manual for details. The same point is that no matter which type of controller is used, the axis mapping needs to be re-mapped to map the handwheel axis to other axis numbers.
Then find the default handwheel interface axis number in the controller manual, use ZAux_Direct_SetAtype(handle, remapped axis No., 0) to set the remapped axis type to 0, restore the axis settings, and it can use ZAux_Direct_SetAtype(handle, the local pulse axis No. to be modified, 0) to set the axis type of the local pulse axis No. that is to be modified to 0. If it is not set for the lower version, an error will be reported.
Also, use the local axis mapping command ZAux_Direct_SetAxisAddress{ handle, remapped axis No., (-1<<16) + local pulse axis No. to be modified }.
(7) Configure handwheel axis parameters
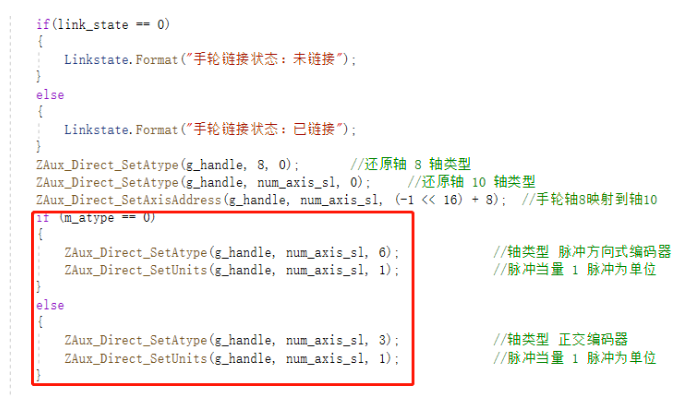
After the axis number mapping parameters are modified, then use ZAux_Direct_SetAtype (handle, handwheel axis No., 3/6) to modify the type of the handwheel axis, ATYPE=3 means quadrature encoder, ATYPE=6 means pulse direction encoder, after this is set, then it can be switched on the running main interface.
Use ZAux_Direct_SetUnits (g_handle, handwheel axis No., UNITS (pulse amount)) to modify the pulse equivalent of the handwheel axis according to actual needs.
(8) Build the handwheel connection
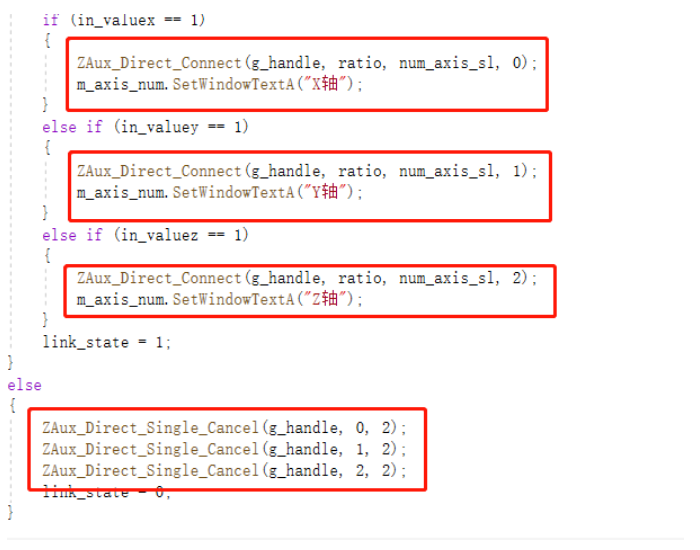
Find the input signal, ratio signal, and emergency stop signal of the axis that correpsonds to the handwheel in controller manual, and use ZAux_Direct_GetIn (g_handle, input No., & get the state value of the input) to read the IO signal, where the motion axis is X, Y , Z correspond to axis 0, 1 and 2 of the controller.

Through the IO signal, use the synchronous motion command ZAux_Direct_Connect (g_handle, link ratio, handwheel axis, motion axis) to link and bind the axes, and use the single-axis motion stop command ZAux_Direct_Single_Cancel (g_handle, motion axis, stop mode) to disconnect axis link.
(9) Get and clear handwheel axis position
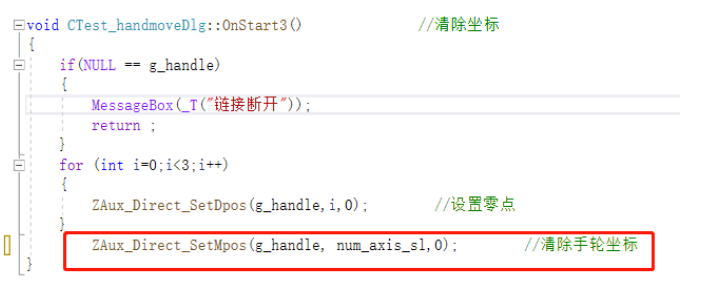
After the link is established, it needs to use ZAux_Direct_GetMpos (g_handle, handwheel axis No., &showpos[handwheel axis No.]) to get the current position of the handwheel axis and display it on the interface.

Use ZAux_Direct_SetMpos (g_handle, handwheel axis No., 0) to clear the handwheel coordinates.
ABOUT ZMOTION
That's all, thank you for your reading -- Zmotion EtherCAT Motion Controller C++ Application on CNC Handwheel Follow-up Processing
For more information, please pay close attention to "Support" and "Download" , and there are other platforms about Zmotion - Youtube & LinkedIn & Twitter & Tiktok & Facebook, including technical information (development environment, routine code), product showing, company development, etc.
Hope to meet you, talk with you and be friends with you. Welcome!
This article is edited by ZMOTION, here, share with you, let's learn together.
ZMOTION: DO THE BEST TO USE MOTION CONTROL.
Note: Copyright belongs to Zmotion Technology, if there is reproduction, please indicate article source. Thank you.
Zmotion Technology focuses on development of motion control technology and general motion control products, it is a national high and new technology enterprise. Due to its concentration and hard work in motion control technology, ZMOTION already become one of the fastest growing industrial motion control companies in China, and is also the rare company who has managed core technologies of motion control and real time industrial control software completely. Here, Zmotion provides motion controller, motion control card, vision motion controller, expansion module and HMI. In addition, there is one program software developed by Zmotion -- ZDevelop. It is a good choice for you to program and compile. And program through upper computer, there is PC manual.
Zmotion Technology provides motion control card, motion controller, vision motion controller, expansion module and HMI. ( more keywords for Zmotion: EtherCAT motion control card, EtherCAT motion controller, motion control system, vision controller, motion control PLC, robot controller, vision positioning...)
Have a good day, best wishes, see you next time.